User Guide
Welcome to TA2’s User Guide!
Teaching Assistant’s Assistant (TA2) is a desktop app that offers a convenient way for teaching assistants from the School of Computing at the National University of Singapore to manage student contacts and keep track of students’ assignment submissions.
TA2 is optimized for use via a Command Line Interface (CLI) while still having the benefits of a Graphical User Interface (GUI). If you can type fast, TA2 can get your contact and assignment management tasks done faster than traditional GUI apps!
This user guide provides you with installation instructions, guide on features of TA2 and some FAQs.
Through this guide, you may encounter the following icons.
-
 Caution: Warns you about potential unintended or undesirable behaviours.
-
 Notes: Provides information that you are required to know.
-
 Tip: Provides additional information that are good to know.
If you are a new user, check out the Quick start section to help you get started with TA2.
For advanced users, the Command summary section gives you an overview of all the commands TA2 offers.
Last Updated: 8 November 2021
Table of Contents
- Quick start
- UI Design
-
Features
- Viewing help:
help - Adding a student:
add - Finding students with matching input keywords:
find - Listing all students:
list - Deleting a student:
delete - Editing a student:
edit - Showing a student’s assignments:
show -
Giving assignment:
givegiveall - Marking an assignment as completed:
done - Removing an assignment of a student:
remove - Removing completed assignments from all students:
clean - Clearing all entries:
clear - Undoing a command:
undo - Redoing a command:
redo - Exiting the program:
exit - Saving the data
- Editing the data file
- Viewing help:
- FAQ
- Command summary
- Glossary
Quick start
-
Ensure you have
Java 11or later installed in your Computer. -
Download the latest
ta2.jarfile from here. -
Copy the file to the folder you want to use as the home folder for TA2.
- Double-click the file to start the app. The window similar to the one shown below should appear in a few seconds.
Note how the app contains some sample data.

-
You can warm up with some commands by typing them in the command input box and pressing Enter to execute it.
Some example commands you can try:
-
list: Lists all of your contacts. -
addn/John Doe m/CS2100 e/e1234567@u.nus.edu: Adds a student namedJohn Doeinto your contact list. -
show1: Displays the assignments of the first student in your assignment list. -
gived/Assignment 1 by/27/3/2022: Gives an assignment,Assignment 1that is due by 27 Mar 2022 at 11.59pm, to the first student in your contact list.
-
- Refer to the Features below for more details of each command.
![]() Tip:
Tip:
- If you are unsure about where the contact list, assignment list or command input box are, check out the Ui Design section.
UI Design
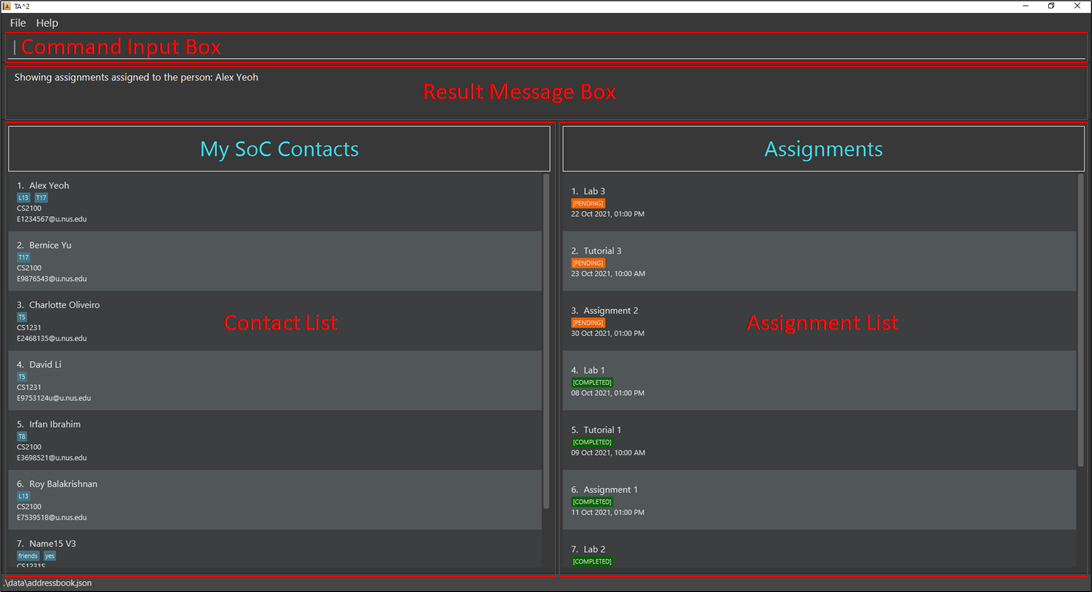
-
Command Input Box: Type your commands here!
-
Result Message Box: Displays the details of the result of your commands.
-
Contact List: Displays your list of students and their relevant information.
-
Assignment List: Displays a specified student’s assignments.
Features
![]() Notes about the command format:
Notes about the command format:
-
Words in
UPPER_CASEare the parameters to be supplied by the user.- e.g. in
add n/NAME,NAMEis a parameter which can be used asadd n/John Doe.
- e.g. in
-
Items in square brackets are optional.
- e.g.
n/NAME [t/TAG]can be used asn/John Doe t/T17or asn/John Doe
- e.g.
-
Items with
… after them can be used multiple times including zero times.- e.g.
[t/TAG]…can be used ast/T17,t/T17 t/Group1etc.
- e.g.
-
Parameters can be in any order.
- e.g. if the command specifies
n/NAME e/EMAIL,e/EMAIL n/NAMEis also acceptable.
- e.g. if the command specifies
-
If a command requires
INDEXas an input, only one input forINDEXis expected.INDEXmust be an integer from 1 to 10,000. -
If a parameter is expected only once in the command, but you specify it multiple times, only the last occurrence of the parameter will be taken, unless otherwise mentioned in the command description.
- e.g. if you specify
m/cs2103 m/cs2101, onlym/cs2101will be taken.
- e.g. if you specify
-
Extraneous parameters for commands that do not take in parameters (such as
help,list,exitandclear) will be ignored.- e.g. if the command specifies
help 123, it will be interpreted ashelp.
- e.g. if the command specifies
Viewing help: help
Shows a help window with a link directing you to this user guide.
Alternatively, you can click the Help button in the top left corner or press F1 on your keyboard to open up the help window (Shown in the image below).

Format: help
Possible usage:
- The help window will direct you back to this user guide from TA2 if you need details of any available features.
Adding a student: add
Adds a student to your contact list with their relevant information.
Format: add n/NAME e/EMAIL m/MODULE [t/TAG]…
![]() Note:
Note:
-
Duplicate
NAMEis not allowed.- e.g.
add n/Alex Yeoh...is not allowed if there is already a student named Alex Yeoh in your contact list.
- e.g.
-
Extra spaces before, after, and between names will be removed.
-
A student’s
MODULEmust follow the format as shown here. -
Only student’s initials and module code will be capitalised on the displayed student list.
-
e.g.
n/alex yeoh,n/DAVID LIwill be converted toAlex YeohandDavid Lirespectively. -
e.g.
cs2100,GER1000twill be converted toCS2100andGER1000Trespectively.
-
-
A student’s
EMAILmust follow the format as shown here. -
Duplicate
EMAILis not allowed.- e.g.
add e/E1234567@u.nus.eduis not allowed if there is already a student with the same email.
- e.g.
-
TAGcan only accept alphanumeric characters with no spaces in between. -
A student can have any number of
TAG(including 0).
Examples:
-
add n/John Doe m/CS1010 e/e1234567@u.nus.edu -
add n/Betsy Crowe e/e0234567@u.nus.edu m/CS2103T -
add n/alex yeoh e/e1234123@u.nus.edu m/GEQ1000 t/T17
Possible Usage:
-
You can use
addto add new students into the contact list when you receive new students. -
TAGcan be used to separate students by their tutorial group or to mark out students that require more attention.
Finding students with matching input keywords: find
Filters and displays your contacts who match at least one of the input keywords.
Format: find [n/NAME]… [m/MODULE]… [t/TAG]…
![]() Note:
Note:
-
There should be at least one prefix.
-
Ordering of prefixes are not strict and presence of multiple keywords are acceptable.
- Keywords are case-insensitive
- e.g.
cs1101swill matchCS1101S.
- e.g.
-
Each part of name separated by space will be matched.
-
e.g.
n/Hansorn/Bowill both matchHans Bo. -
e.g.
n/Samwill matchSam Tanbut notSamuel Lee.
-
-
Students’ names matching at least one keyword will be returned (i.e.
ORsearch).- e.g.
n/Hans Bowill returnHans Gruber,Bo Yang.
- e.g.
-
Prefixes with empty keywords will not match anyone.
- e.g.
find n/ m/ t/will return 0 students
- e.g.
- Module codes must strictly follow the module naming convention shown here.
![]() Tip:
Tip:
- We can search for multiple fields.
- e.g.
m/CS1101S CS2103Torm/CS1101S m/CS2103Twill return people who take either modules.
- e.g.
Examples:
-
find n/Bernicereturns the students who haveBernicein their name. -
find m/CS1101Sreturns the students taking moduleCS1101S. -
find t/Lab15returns the students with the tagLab15. -
find n/Bernice m/MA1521returns the students who haveBernicein their name or are taking moduleMA1521. -
find m/CS1231 t/Group04returns the students taking moduleCS1231or with the tagGroup04. -
find n/Evian m/CS2103T t/Group10returns the students who match at least one of the requirements: haveEvianin their name, taking moduleCS2103Tor with the tagGroup10. -
find t/E34 n/Brian m/GEQ1000returns the students who match at least one of the requirements: haveBrianin their name, taking moduleGEQ1000or with the tagE34. -
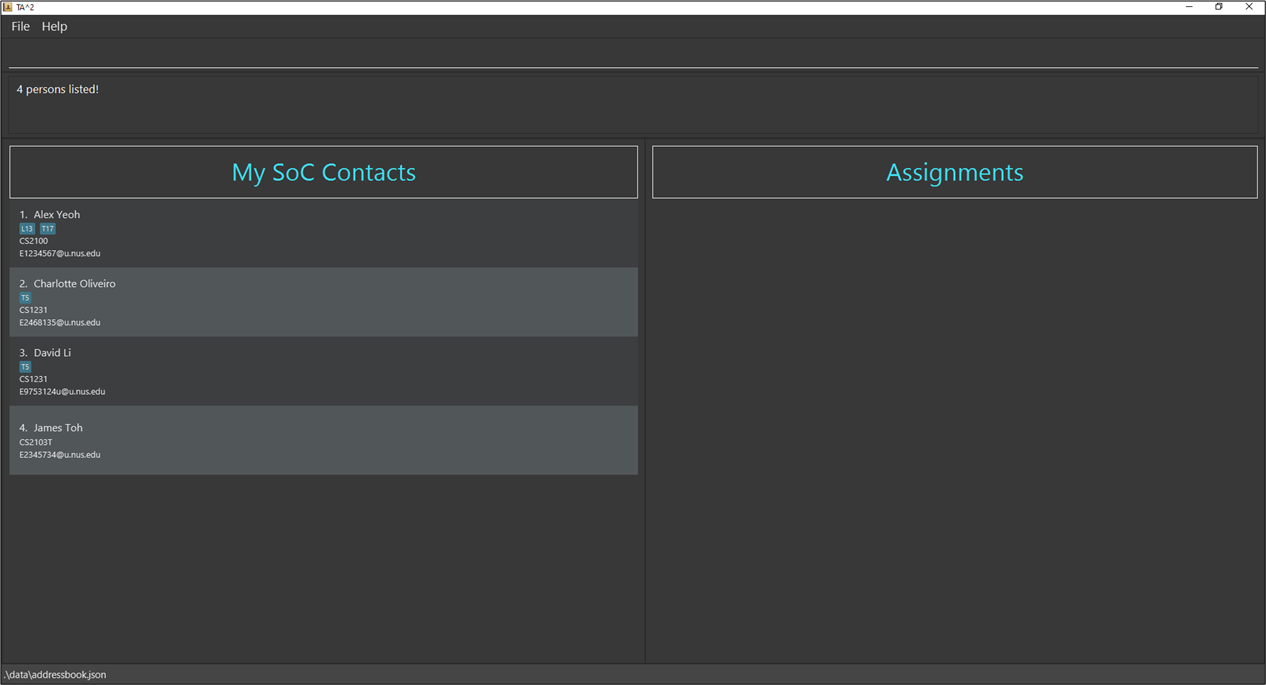
find n/alex david m/cs1231 cs2103treturns the students who at least satisfy one of the requirements: havedavidoralexin their names, taking modulescs1231orcs2103t(Shown in the image below).
Possible Usage:
-
You can use
findto help you find a specific student. -
You can use
findto help you filter the list to show only students of a specific:-
MODULEif you are teaching multiple modules. -
TAGif you use it to separate students by tutorial groups.
-
Listing all students: list
Shows a list of all students in the contact list.
Format: list
Possible Usage:
- After using
findto filter the list, you can uselistto reset the contact list to show all students.
Deleting a student: delete
Deletes the specified student from the contact list.
Format: delete INDEX
- Deletes the student from the contact list at the specified
INDEX.
Examples:
-
delete 2deletes the second student in the contact list (if 2nd student exists).
Possible usage:
- You can use
deleteto delete any student that you do not need to keep track of anymore.
Editing a student: edit
Modifies any part of the student’s information.
Format: edit INDEX [n/NAME] [m/MODULE] [e/EMAIL] [t/TAG]…
- Edits the student’s relevant information at the specified
INDEX.
![]() Note:
Note:
-
The index refers to the index number of the student in the displayed contact list.
-
The index must be a positive integer and must not exceed number of students displayed in your contact list 1, 2, 3, …(till the index of the last student).
-
If you have two identical prefixes with the
editcommand, only the last prefix will be used for the edit (except for prefix t/). -
Require at least one prefix to edit.
![]() Tip:
Tip:
-
You can modify several parts of the student information at the same time.
-
If you wish to remove the tags for a student, simply type
t/prefix without any parameters.
Examples:
-
edit 2 e/e0001111@u.nus.edureplaces the second student’s email in the displayed contact list withe0001111@u.nus.edu. -
edit 1 n/Brobchanges first student’s name in the displayed contact list toBrob. -
edit 1 n/Brob n/New m/cs1101 m/cs1231schanges first student’s name in the displayed contact list toNewand module tocs1231s.
Possible Usage:
- You can use
editto make changes to any mistakes in a student’s information.
Showing a student’s assignments: show
Shows the assignments of the specified student in your assignment list.
Format: show INDEX
- Shows the assignments of the student at the specified
INDEXof the displayed contact list.
![]() Note:
Note:
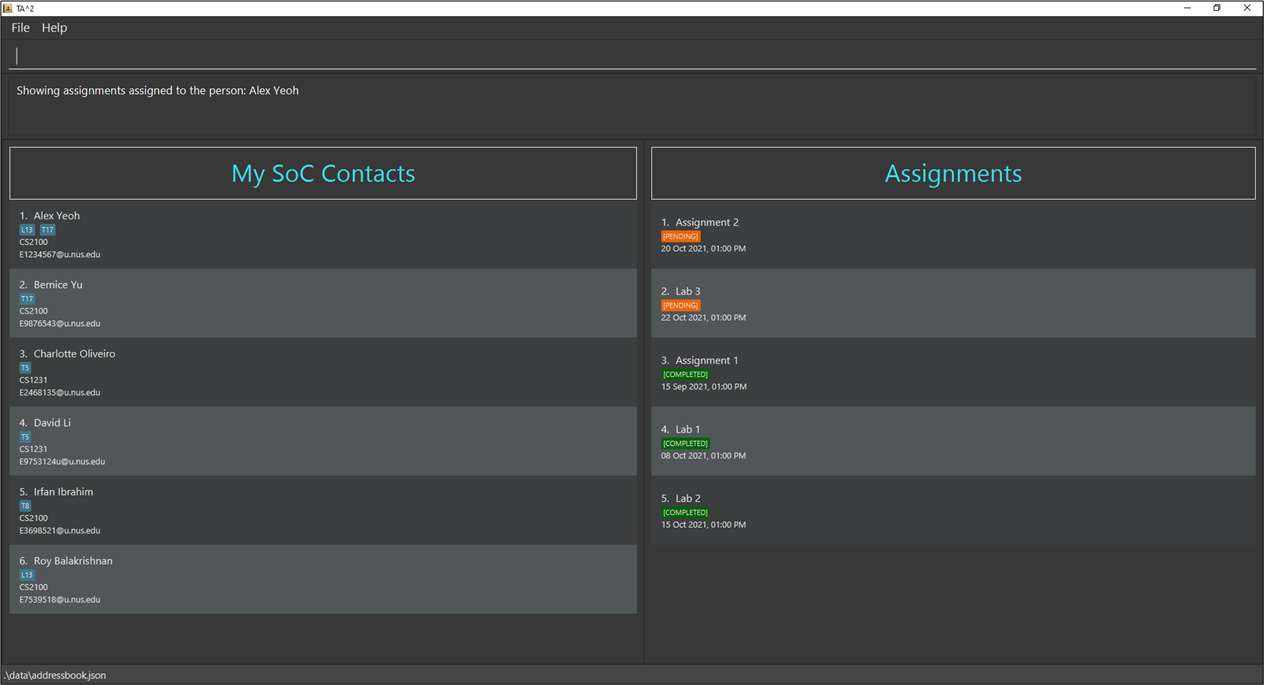
The assignment list is always sorted by the date and status.
-
Assignments with
COMPLETEDstatus will be at the bottom of the list. -
Assignments with
PENDINGstatus will be at the top of the list. -
Assignments with earlier due dates will be ranked higher within the same status.
Examples:
-
The index refers to the index shown in the displayed student list.
-
show 1renders the first student’s assignments on the assignment list (Shown in the image below).
Possible Usage:
- You can use
showto display the assignments of the student you would like to see and make modifications to. - You can look to the top of the assignment list to find out which assignments will be due soon or are overdue.
Giving assignment: give giveall
Giving an assignment to a student: give
Gives an assignment to the student specified by the index in the contact list.
Format: give INDEX d/DESCRIPTION by/ d/M/yyyy [,HHmm]
- Gives the specified assignment to the student in the contact list at the specified
INDEX.
![]() Note:
Note:
-
Assignments with similar descriptions with excess whitespace between words are still considered duplicate.
- e.g.
Assignment 2is the same asAssignment 2butAssignment 2is not the same asAssignment2
- e.g.
-
Assignment descriptions are case-insensitive.
- e.g.
Assignment 2is the same asaSsignment 2
- e.g.
![]() Tip:
Tip:
-
The date
d/M/yyyycan be replaced by friendly commands. -
If time
[,HHmm]is not specified, time will be set to11:59 pmby default. -
You can give assignments with due dates before today in case you wish to keep a record of old assignments.
Examples:
-
give 1 d/Lab 1 by/21/8/2021gives the first student displayed in your contact list an assignment of descriptionLab1with a deadline21 Aug 2021, 11:59pm. -
give 2 d/Assignment 2 by/ 2/9/2021,1200gives the second student displayed in your contact list an assignment of descriptionAssignment 2with a deadline22 Sep 2021, 12:00pm.
-
If the current date is
1 Nov 2021and it is a Monday-
give 1 d/Tutorial 3 by/mongives the first student displayed in your contact list an assignment of descriptionTutorial 3with a deadline8 Nov 2021, 11:59pm. -
give 2 d/Report 1 by/tue, 1800gives the second student in your contact list an assignment of descriptionReport 1with a deadline2 Nov 2021, 06:00pm.
-
Possible Usage:
- You can use
givewhen there is an assignment that you want to give to selected students only.
Giving an assignment to all students in a module: giveall
Gives an assignment to all students in the specified module .
Format: giveall m/MODULE d/DESCRIPTION by/ d/M/yyyy [,HHmm]
![]() Note:
Note:
-
Assignments with similar descriptions with excess whitespace between words are still considered duplicate.
- e.g.
Assignment 2is the same asAssignment 2butAssignment 2is not the same asAssignment2
- e.g.
-
Assignment descriptions are case-insensitive.
- e.g.
Assignment 2is the same asaSsignment 2.
- e.g.
-
It is possible to give an assignment using
givealleven if some students already have the assignment. Students who have the assignment will not receive a duplicate assignment. -
If some students already have the assignment, executing
giveallrequires the due date to be similar to the pre-existing assignments. The command will not be valid if the due date is different. This is to ensure consistency of the due dates of the same assignment.
![]() Tip:
Tip:
-
The date
d/M/yyyycan be replaced by friendly commands. -
If time
[,HHmm]is not specified, time will be set to11:59 pmby default. -
You can give assignments with due dates before today in case you wish to keep a record of old assignments.
Examples:
-
giveall m/CS2100 d/Assignment 1 by/ 13/07/2021,1900is an invalid input if some students of module CS2100 has the assignment of descriptionAssignment 1with a deadline15 Jul 2021, 07:00pm. -
giveall m/CS2100 d/Assignment 2 by/ 15/10/2021gives all students of module CS2100 an assignment of descriptionAssignment 2with a deadline15 Oct 2021, 11:59pm. -
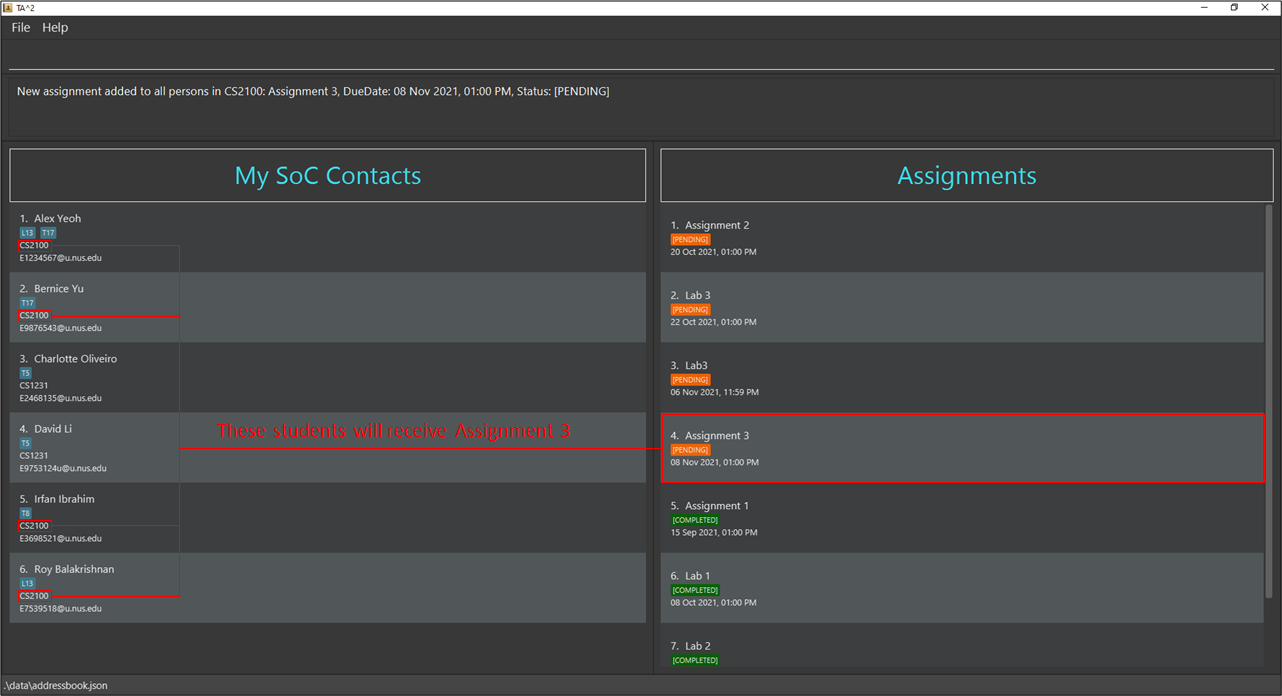
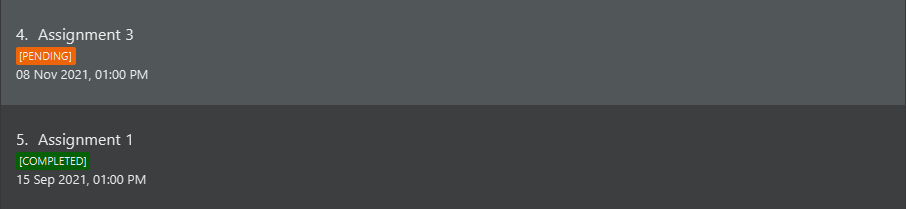
giveall m/CS2100 d/Assignment 3 by/ 08/11/2021, 1300gives all students of module CS2100 an assignment of descriptionAssignment 3with a deadline08 Nov 2021, 01:00pm(Shown in the image below).
Possible Usage:
- You can use
giveallinstead ofgivewhen there is a module assignment, where all students under the same module is required to submit the same assignment.
Marking an assignment as completed: done
Marks a specified assignment of a student as completed.
Format: done INDEX
- Marks the assignment at the specified
INDEXas completed in the displayed assignment list of a student.
![]() Note:
Note:
-
Remember to display the student’s assignments using show before using the
donecommand! -
Shown in the image below:
-
Assignments with
PENDINGstatus will be colour-coded in orange. -
Assignments with
COMPLETEDstatus will be colour-coded in green.
-
Examples:
-
done 3marks the 3rd assignment in the displayed assignment list as completed.
Possible Usage:
- You can use
doneto track the completion status of an assignment among your students.
Removing an assignment of a student: remove
Removes the specified assignment from a student.
Format: remove INDEX
- Removes the assignment at the specified
INDEXin the displayed assignment list of a student.
Examples:
-
remove 10removes the 10th assignment in the displayed assignment list of a student.
![]() Note:
Note:
Remember to display the student’s assignments using show before using the remove command!
Possible Usage:
- You can use
removeif you have wrongly added an assignment to a student.
Removing completed assignments from all students: clean
Removes all completed assignments from all students in your TA2 contact list.
Format: clean
Possible Usage:
- You can use
cleanto reduce clutter in the assignment list.
Clearing all entries: clear
Clears all entries from TA2 contact list.
Format: clear
![]() Caution:
Caution:
- This command clears the entire contact list and you should only do so if you are sure to proceed with the command.
![]() Tip:
Tip:
- If you have wrongly cleared the contact list, you can use
undoimmediately to restore to the previous state.
Possible Usage:
- You can use
clearif you no longer need to keep track of students after they have completed the module.
Undoing a command: undo
Undo the latest change made to TA2.
Format: undo
![]() Note:
Note:
-
You cannot undo some commands such as
help. The undo command will instead undo the previous change preceding the command that cannot be undone. -
When you first start TA2, there is nothing to undo.
-
You can execute undo multiple times up until the point where you first launched the application.
Redoing a command: redo
Recovers the latest change of the last undo command.
Format: redo
Exiting the program: exit
Exits the program.
Format: exit
Saving the data
TA2 data are saved in the hard disk automatically after any command that changes the data. There is no need to save manually.
Editing the data file
TA2 data are saved as a JSON file [JAR file location]/data/ta2.json. Advanced users are welcome to update data directly by editing that data file.
![]() Caution:
Caution:
- If your changes to the data file make its format invalid, TA2 will discard all data and start with an empty data file at the next run.
FAQ
Q: How do I transfer my data to another Computer?
A: Install the app in the other computer and overwrite the empty data file it creates with the file that contains the data of your previous TA2 home folder.
Q: How can I get the sample data back?
A: Close your TA2 application. Go into the data folder in your home folder for TA2, delete the ta2.json file and start TA2 again.
Command summary
| Action | Command | Format | Examples |
|---|---|---|---|
| Viewing help | help | help |
|
| Adding a student | add |
add n/NAME e/EMAIL m/MODULE [t/TAG]…
|
add n/James Ho m/CS2100 e/E7954753@u.nus.edu t/T25 |
| Finding students with matching input keywords | find |
find [n/NAME]… [m/MODULE]… [t/TAG]…
|
find n/James Jake m/CS2100 t/T13 |
| Listing all students | list | list |
|
| Deleting a student | delete |
delete INDEX
|
delete 3 |
| Editing a student | edit |
edit INDEX [n/NAME] [m/MODULE] [e/EMAIL] [t/TAG]…
|
edit 2 n/James Lee e/E4853765@u.nus.edu |
| Showing a student’s assignments | show |
show INDEX
|
show 2 |
| Giving an assignment to a student | give |
give INDEX d/DESCRIPTION by/ d/M/yyyy [,HHmm]
|
give 1 d/Lab1 by/ 21/8/2021,1600 |
| Giving an assignment to all students in a module | giveall |
giveall m/MODULE d/DESCRIPTION by/ d/M/yyyy [,HHmm]
|
giveall m/CS2100 d/Lab1 by/ 21/8/2021 |
| Marking an assignment of a student | done |
done INDEX
|
done 4 |
| Removing assignment of a student | remove |
remove INDEX
|
remove 10 |
| Removing completed assignments from all students | clean | clean |
|
| Clearing all entries | clear | clear |
|
| Undoing a command | undo | undo |
|
| Redoing a command | redo | redo |
|
| Exiting the program | exit | exit |
Glossary
Module Naming Convention
- The module format is XX[X]1111[X], where X is any letter, 1 is any number and values in square brackets are optional.
Email format
Emails should be of the format local-part@domain whereby the domain name is made up of domain labels.
-
The whole
EMAILmust have a maximum of 320 characters. -
The local part should only contain alphanumeric characters and these special characters
+ - . _. - The local part must:
-
have a maximum of 64 characters.
-
not start or end with any special characters.
-
not contain 2 consecutive special characters.
-
- The domain name must:
-
have a maximum of 255 characters.
-
end with a domain label at least 2 characters long.
-
have each domain label start and end with alphanumeric characters.
-
have each domain label consist of alphanumeric characters, separated only by hyphens, if any.
-
Friendly commands
![]() Tip:
Tip:
Friendly commands are all case-insensitive. TODAY and today are equivalent and will be rightfully detected.
-
today- sets due date to tonight. -
tmr- sets due date to tomorrow. -
week- sets due date to a week (7 days) from now. -
mon- sets due date to the coming Monday. -
tue- sets due date to the coming Tuesday. -
wed- sets due date to the coming Wednesday. -
thu- sets due date to the coming Thursday. -
fri- sets due date to the coming Friday. -
sat- sets due date to the coming Saturday. -
sun- sets due date to the coming Sunday.