Developer Guide
Welcome to TA2’s Developer Guide!
Teaching Assistant’s Assistant (TA2) is a desktop application designed for teaching assistants from the School of Computing (SoC) at the National University of Singapore (NUS) to manage student information and keep track of students’ assignment submissions.
If you are interested in contributing to TA2, this guide is designed to help you get started! There are a variety of ways to contribute to TA2 such as coding, testing, improving the design of the interface and updating the documentation.
Last Updated: 8 November 2021
Table of Contents
- Acknowledgements
- Setting up, getting started
- Design
- Implementation
- Documentation, logging, testing, configuration, dev-ops
- Appendix: Requirements
-
Appendix: Instructions for manual testing
- Launch and shutdown
- Viewing Help
- Adding a person
- Finding a person
- Listing all Persons
- Deleting a person
- Editing a person
- Showing an assignment list
- Giving an assignment
- Giving an assignment to all persons in a module
- Marking an assignment
- Removing an assignment
- Cleaning all completed assignments
- Clearing all entries
- Undoing a command
- Redoing a command
- Exiting the Program
- Saving data
Acknowledgements
- TA2 is adapted from AddressBook-Level3 (AB3)
- For the detailed documentation of AddressBook-Level3 project, see the Address Book Product Website.
- Libraries used: JavaFX, Jackson, JUnit5, TemporalAdjusters
- Code reused:
Setting up, getting started
To get started, check out this guide Setting up and getting started.
Design
.puml files used to create diagrams in this document can be found in the diagrams folder. Refer to the PlantUML Tutorial at se-edu/guides to learn how to create and edit diagrams.
Architecture
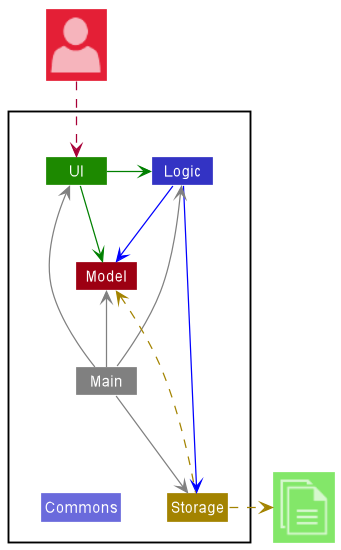
The Architecture Diagram given above explains the high-level design of the App.
Given below is a quick overview of main components and how they interact with each other.
Main components of the architecture
Main has two classes called Main and MainApp. It is responsible for,
- At app launch: Initializes the components in the correct sequence, and connects them up with each other.
- At shut down: Shuts down the components and invokes cleanup methods where necessary.
Commons represents a collection of classes used by multiple other components.
The rest of the App consists of four components.
-
UI: The UI of the App. -
Logic: The command executor. -
Model: Holds the data of the App in memory. -
Storage: Reads data from, and writes data to, the hard disk.
How the architecture components interact with each other
The Sequence Diagram below shows how the components interact with each other for the scenario where the user issues the command delete 1.

Each of the four main components (also shown in the diagram above),
- defines its API in an
interfacewith the same name as the Component. - implements its functionality using a concrete
{Component Name}Managerclass (which follows the corresponding APIinterfacementioned in the previous point.
For example, the Logic component defines its API in the Logic.java interface and implements its functionality using the LogicManager.java class which follows the Logic interface. Other components interact with a given component through its interface rather than the concrete class (reason: to prevent outside component’s being coupled to the implementation of a component), as illustrated in the (partial) class diagram below.
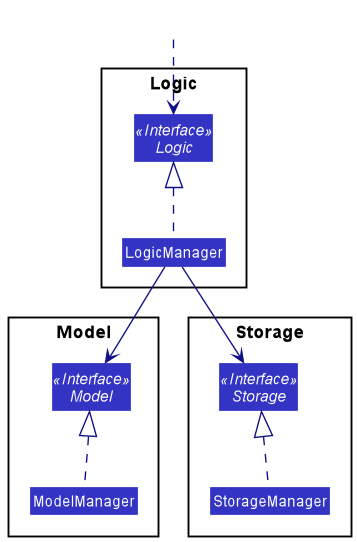
The sections below give more details of each component.
UI component
The API of this component is specified in Ui.java
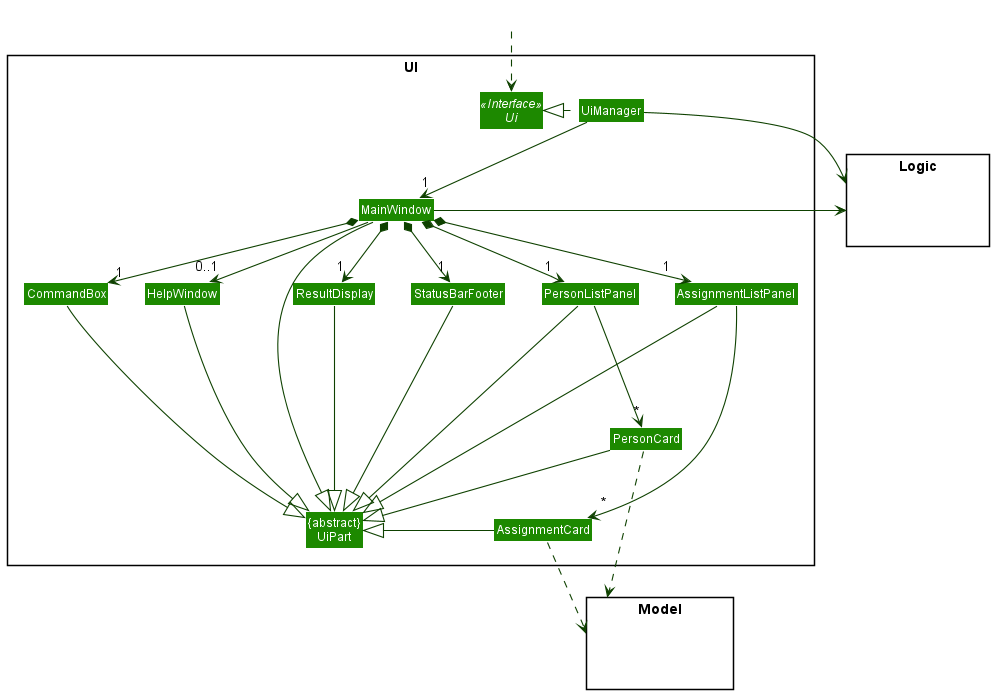
The UI consists of a MainWindow that is made up of parts e.g.CommandBox, ResultDisplay, PersonListPanel, StatusBarFooter etc. All these, including the MainWindow, inherit from the abstract UiPart class which captures the commonalities between classes that represent parts of the visible GUI.
The UI component uses the JavaFx UI framework. The layout of these UI parts are defined in matching .fxml files that are in the src/main/resources/view folder. For example, the layout of the MainWindow is specified in MainWindow.fxml
The UI component,
- executes user commands using the
Logiccomponent. - listens for changes to
Modeldata so that the UI can be updated with the modified data. - keeps a reference to the
Logiccomponent, because theUIrelies on theLogicto execute commands. - depends on some classes in the
Modelcomponent, as it displaysPersonandAssignmentobject residing in theModel.
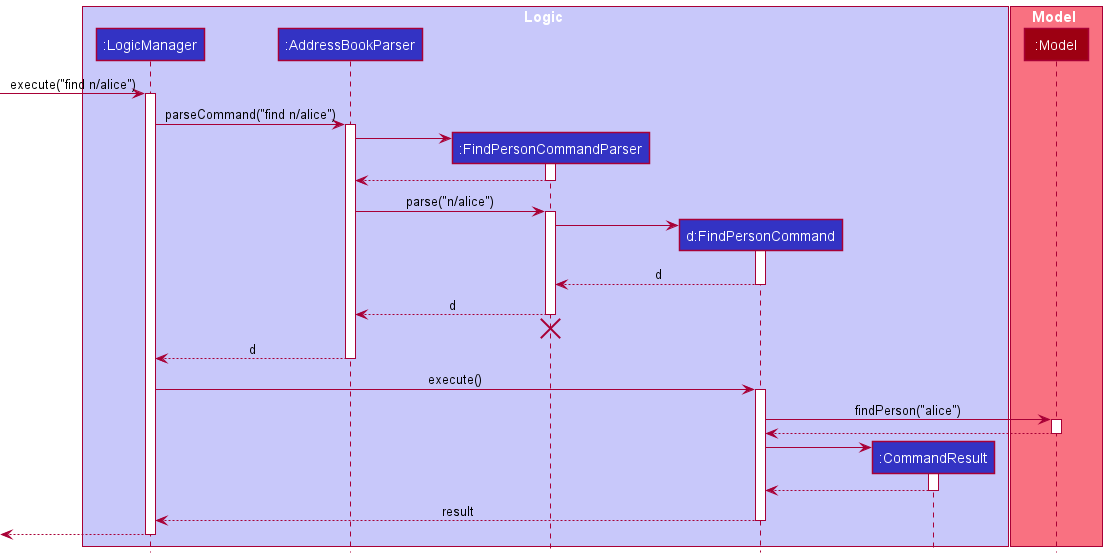
Logic component
API : Logic.java
Here’s a (partial) class diagram of the Logic component:

How the Logic component works:
- When
Logicis called upon to execute a command, it uses theAddressBookParserclass to parse the user command. - This results in a
Commandobject (more precisely, an object of one of its subclasses e.g.,AddCommand) which is executed by theLogicManager. - The command can communicate with the
Modelwhen it is executed (e.g. to add a person). - The result of the command execution is encapsulated as a
CommandResultobject which is returned back fromLogic.
The Sequence Diagram below illustrates the interactions within the Logic component for the execute("delete 1") API call.
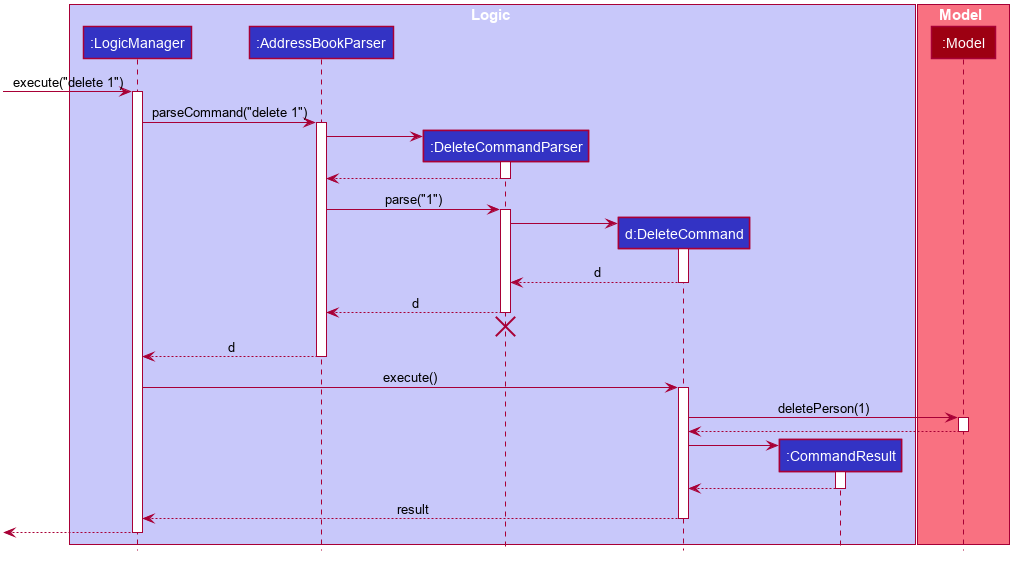
DeleteCommandParser should end at the destroy marker (X) but due to a limitation of PlantUML, the lifeline reaches the end of diagram.
Here are the other classes in Logic (omitted from the class diagram above) that are used for parsing a user command:
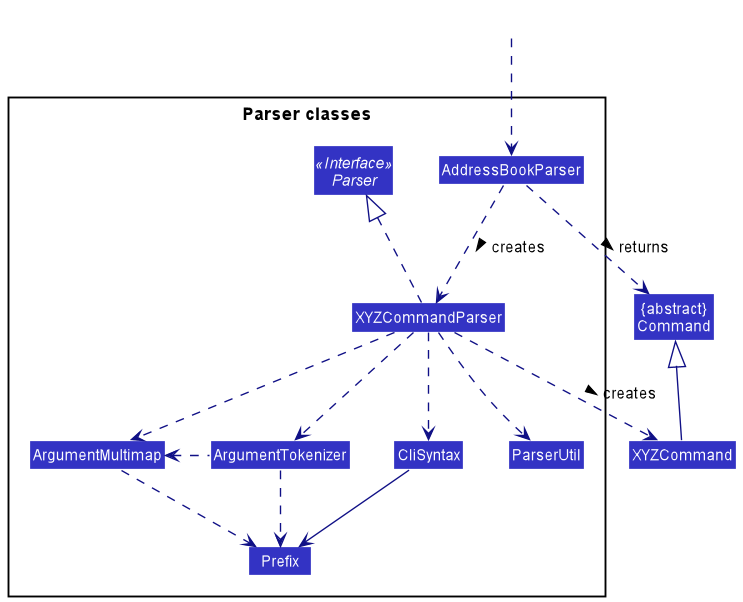
How the parsing works:
- When called upon to parse a user command, the
AddressBookParserclass creates anXYZCommandParser(XYZis a placeholder for the specific command name e.g.,AddCommandParser) which uses the other classes shown above to parse the user command and create aXYZCommandobject (e.g.,AddCommand) which theAddressBookParserreturns back as aCommandobject. - All
XYZCommandParserclasses (e.g.,AddCommandParser,DeleteCommandParser, …) inherit from theParserinterface so that they can be treated similarly where possible e.g, during testing.
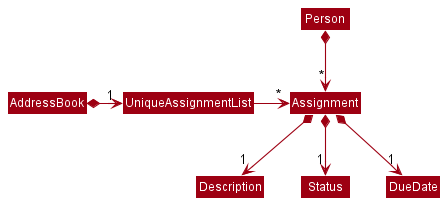
Model component
API : Model.java
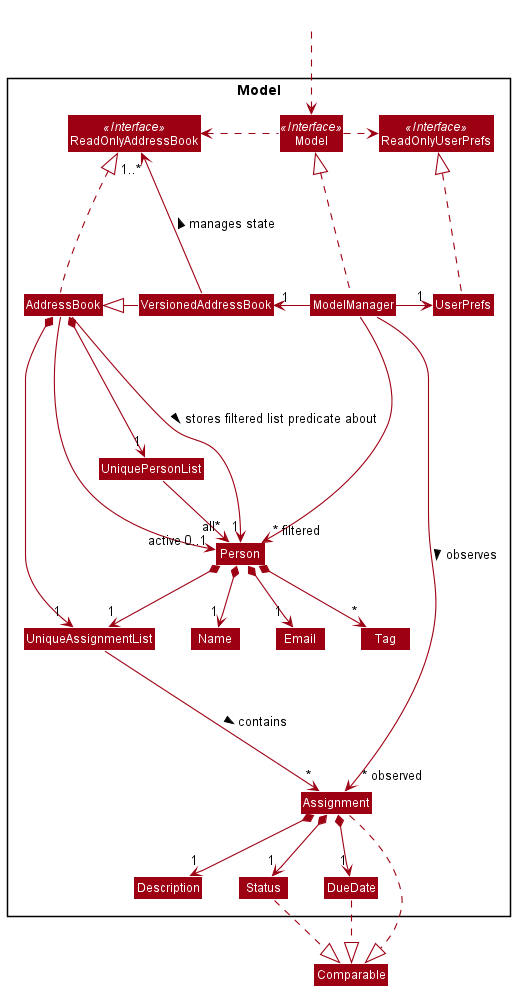
The Model component,
- stores the versioned address book data which includes
- all
Personobjects contained in aUniquePersonListobject - all
Assignmentobjects of the “active”Personobject contained in aUniqueAssignmentListobject - the “active”
Person(the person whose assignments are stored inUniqueAssignmentListofAddressBook) - the current predicate of the filtered person list
- the states of
ReadOnlyAddressBook
- all
- stores the currently ‘selected’
Personobjects (e.g., results of a search query) as a separate filtered list which is exposed to outsiders as an unmodifiableObservableList<Person>that can be ‘observed’ e.g. the UI can be bound to this list so that the UI automatically updates when the data in the list change. - stores the currently ‘selected’
Assignmentobjects of the “active”Personobject as a separate observable list which is exposed to outsiders as an unmodifiableObservableList<Assignment>that can be ‘observed’ as well. - stores a
UserPrefobject that represents the user’s preferences. This is exposed to the outside as aReadOnlyUserPrefobjects. - does not depend on any of the other three components (as the
Modelrepresents data entities of the domain, they should make sense on their own without depending on other components)
Storage component
API : Storage.java
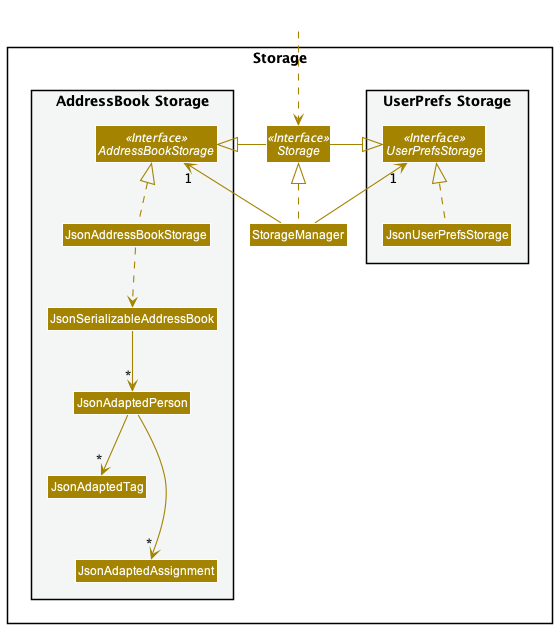
The Storage component,
- can save both address book data and user preference data in json format, and read them back into corresponding objects.
- inherits from both
AddressBookStorageandUserPrefStorage, which means it can be treated as either one (if only the functionality of only one is needed). - depends on some classes in the
Modelcomponent (because theStoragecomponent’s job is to save/retrieve objects that belong to theModel)
Common classes
Classes used by multiple components are in the seedu.address.commons package.
Implementation
This section describes some noteworthy details on how certain features are implemented.
Find feature
Implementation
The find command allows users to find specific people in their list, based on certain
matching criteria such as:
- Name
- Module
- Tags
The command is represented by the find keyword.
This allows users to specify their list and cut down on the amount of information displayed, selectively choosing those that the users would only like to see.
The find Command is a subclass of the Command class. Once the user enters the find
keyword, the LogicManager class will execute the command and pass the
input to the AddressBookParser class to parse the given input.
From this class, a specific parser class known as the FindPersonCommandParser
is created and used to parse the input based on the find specificity.
Next, the FindPersonCommandParser class returns a FindPersonCommand or
an exception, depending on the validity of the command input. The
Command#execute is then called, returning a CommandResult class.
Given below is a more specific example of the command execution.
- The user wants to find a specific person based on their name
- The user executes
find n/alice, causing aFindPersonCommandto be returned - The Command#execute is called, which causes the list to update and reflect those whose names matches alice
The sequence of this command execution can be visualized using the below sequence diagram:
FindPersonCommand
should end at the destroy marker (X) but due to a limitation of PlantUML, the lifeline reaches the end of diagram.
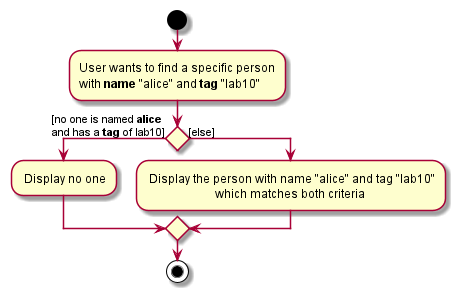
The following activity diagram summarizes what happens when a user executes the find command:
Design considerations
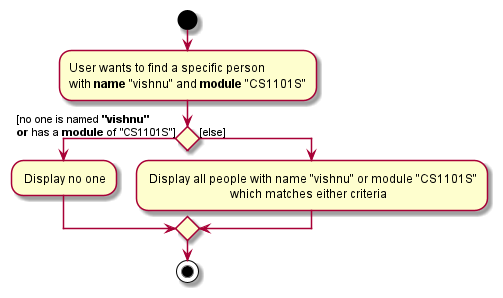
Aspect: Finding people based on OR criteria or AND criteria
-
Alternative 1 (current choice): Allows user to find people based on OR criteria
- Pros: Allows for a more flexible search, making it less error-prone
- Cons: Reduce efficiency of searching for specific people if large chunks of information is returned
-
Alternative 2: Allow users to find people based on AND criteria
- Pros: Users can perform more powerful searching to suit their requirements and criteria, thus possibly being more effective and efficient if the user knows who is in mind
- Cons: Less error tolerant as one simple mistake can result in no matches being returned.
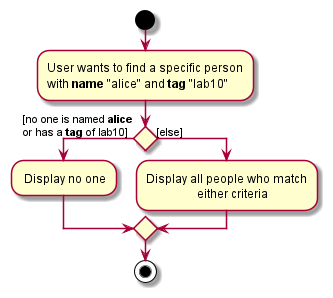
[Proposed] Find Extension
Allow finding to have both specificity and flexibility
Proposed Implementation
In order to create the option for the users to select the type of find they are trying to execute, be it specific or flexible, such a functionality is implemented in the following way:
The proposed find extension to allow specificity and flexibility can be implemented by altering
how theFindCommandParser class works. Users are required to specify an extra parameter to denote
the type of find they are trying to execute.
This extra parameter will be -S and -F to represent specific and flexible respectively.
An example command call:
-
find -s n/Bryan m/CS1101Sto find all people named Bryan who are enrolled in CS1101S- Bryan Loh enrolled in module CS1101s will be listed.
- Bryan Tan enrolled in module CS1231S will not be listed.
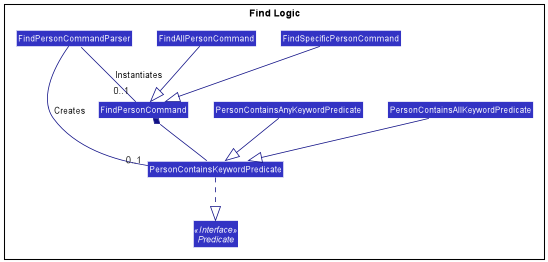
This can be facilitated by splitting the FindPersonCommand into two subtypes: FindSpecificPersonCommand
and FindAllPersonCommand.
With the separation of the commands, two new classes to test for keywords have to be created, namely the
PersonContainsAllKeywordsPredicate and PersonContainsAnyKeywordPredicate. These two classes will then
extend the PersonContainsKeywordPredicate class which implements the Predicate<T> interface,
and then override the methods stipulated by the interface.
This way, FindSpecificPersonCommand instantiates the PersonContainsAllKeywordsPredicate class whilst
FindAllPersonCommand instantiates the PersonContainsAnyKeywordPredicate class.
Given below is the partial class diagram of how the logic behind the new find command works:
The following is the activity diagram for a specific find command execution:
The following is the activity diagram for a flexible find command execution:
Design considerations
Aspect: How the different find commands can be implemented
-
Alternative 1 (current choice): Create subclasses to handle the different kinds of behaviour of
Find.- Pros: Easy to extend classes and implement different functionalities
- Cons: User has to input more prefixes to specify the command
-
Alternative 2: Have the parser identify the different find commands without extra prefixes
- Pros: User can use the find command as per usual without extra prefixes / inputs
- Cons: Requires the application to recognize a lot of different user inputs which could mean different kinds of find, which is unfeasible to implement considering the time given
Assignment Feature
Implementation
The Assignment class encapsulates the current Assignment feature and composes of Description, Status and DueDate class.
It implements the operation Assignment#isSameAssignment(Assignment assignment) to check for duplicate assignments. Currently, assignments are similar if they have the same description and this check is case-insensitive. This is because each student is under one module and having a similarly named assignment within the same module is less likely.
Next, the current available Status of Assignment are PENDING and COMPLETED. Since the type of Status are fixed, the Status class contains an enumeration StatusType to store the valid values. The use of static methods Status#createCompletedStatus() and Status#createPendingStatus() initialises the COMPLETED Status and PENDING Status respectively. Meanwhile, the constructor, Status(StatusType value), is set to private to prevent instantiation through inheritance.
Related Implementation: UniqueAssignmentList
A UniqueAssignmentList stores a list of Assignment and prevents duplicates. Assignment class extends Comparable interface for sorting purposes within a UniqueAssignmentList. Currently, only AddressBook and Person has a reference to UniqueAssignmentList.
UniqueAssignmentList#sort() is a method responsible for sorting the list based on the Status and DueDate of the Assignment. The UniqueAssignmentList gives more importance to assignments that are pending than completed, and if both are pending, it will break the tie by choosing the assignment with an earlier due date.
Design considerations
Aspect: How Status can be instantiated:
-
Alternative 1 (current choice): Instantiate Status using static methods with enumerations to store the fixed values
- Pros: Easy to implement.
- Cons: May become harder to update if there are more types of status with different types of behaviour
-
Alternative 2: Use a factory method to instantiate the different types of status
- Pros: Divides cleanly all the different types of status and intended behaviour and make it very easy to add new status with few adjustments by creating another subclass.
- Cons: The code length is very long due to all the subclasses of status and may not be optimal for Status class with very few status types.
Assignment list panel display feature
Implementation
The assignment list panel display mechanism is facilitated by AddressBook, where the specified person’s assignment list is stored internally under assignments This assignments is retrieved or updated by the following methods:
AddressBook#getAssignmentList()-
AddressBook#updateAssignmentList(Person person)— wherepersonis the specified person.
These methods are exposed in the Model interface as Model#getAssignmentList() and Model#updateAssignmentList(Person person) respectively.
In addition, Model contains a field assignmentsList that points towards assignment in AddressBook. assignmentsList serve as connection for Logic to retrieve assignments to display.
Given below is an example usage scenario and how the show assignment mechanism behaves at each step.
Step 1. The user launches the application for the first time. The assignments will be initialized with a UniqueAssignmentList that does not contain any Assignment.
Step 2. The user inputs show 2 command to display the 2nd person’s assignment list in the address book. The show command will then call Model#updateAssignmentList(person), whereby person variable is the 2nd person in the address book.
This will then call Addressbook#updateAssignmentList(person), causing the assignments in AddressBook to be replaced with the assignments in 2nd person’s assignment list.
The two object diagram below shows illustrates how the objects interacts and changes when a show command is executed.

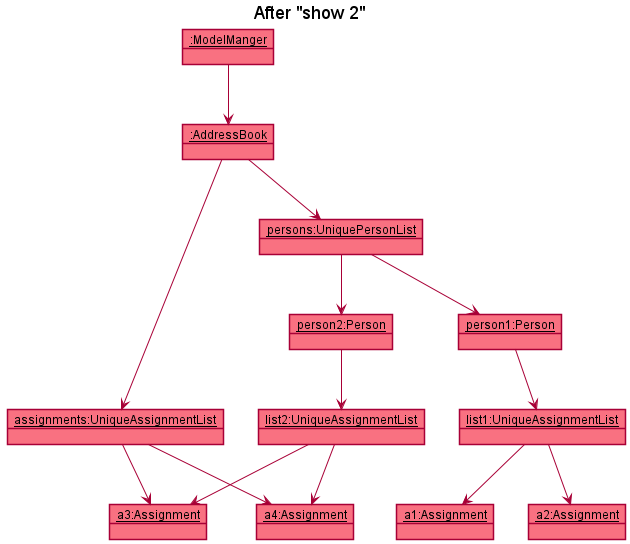
Step 3. When assignments is updated, the assignment list panel of theUi will be updated accordingly since it is an observer of the assignments list in Model
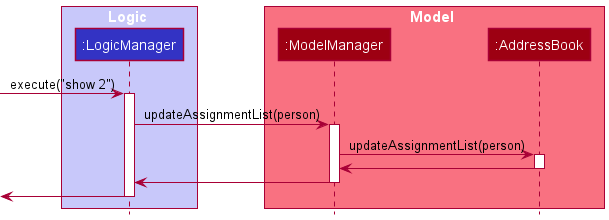
The sequence diagram below illustrates the interactions between the Logic and Model component, when an assignment command (e.g show, give, done, remove) is called.
Design considerations:
Aspect: How the assignment list can be displayed:
-
Alternative 1(current choice): Displays assignment list next to the contact list panel in the same window.
-
Pros: Allows you to do everything on one window.
-
Cons: Commands that deal with persons and assignments need to be distinctly named as they share the same window.
e.g.addperson andaddassignments will have conflict.
-
-
Alternative 2: Displays assignment list on a new separate window.
-
Pros: Allows you to cleanly segregate commands of assignments and persons because they are on different windows.
-
Cons: Additional UI may lead to slower processing and execution.
-
Keeping track on person whose assignments are displayed feature
Implementation
The activePerson field is a reference to a Person object within UniquePersonList, wrapped in an Optional, whose Assignment objects are stored in UniqueAssignmentList within AddressBook. It forms the bedrock of many commands that involves Assignment in UniqueAssignmentList.
activePerson field is wrapped in an Optional because there is a possibility that there is no activePerson, which means that there is no Person object whose assignment list is currently stored in the UniqueAssignmentList.
The ModelManager has a reference to the VersionedAddressBook which is a subclass of AddressBook and has the following accessors to activePerson:
-
Model#hasActivePerson()— Checks the presence of active person. -
Model#getActivePerson()— Retrieves the active person if it exists to perform operations on the person’s assignment list.
Operations that may change the person whose assignments are displayed will use the above accessors before calling Model#updateAssignmentList(Person person) to change the target of activePerson to the person parameter, wrapped in an Optional if it exists in UniquePersonList. If not, activePerson will be updated to an empty Optional that means an absence of activePerson.
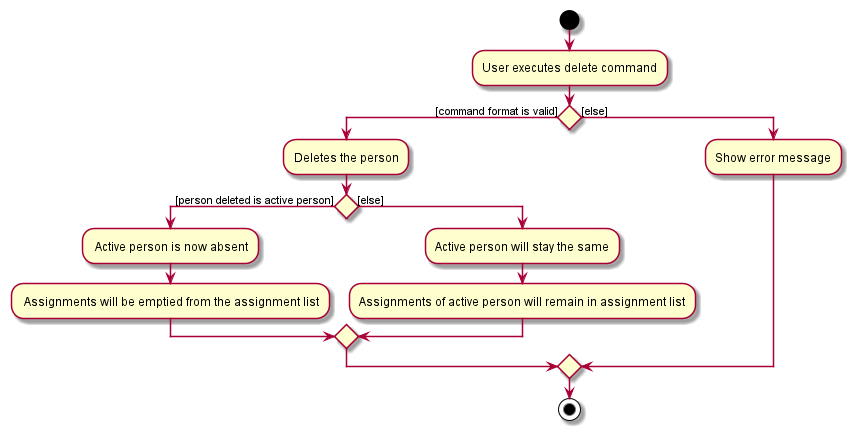
The delete command is one of the commands that may affect the assignment list displayed. Since Person objects and their Assignments share a whole-part relationship, when a Person object is deleted, their list of Assignment should be deleted as well. Hence, if a particular Person object is the activePerson, the UniqueAssignmentList in AddressBook should be cleared of Assignment objects belonging to that Person if he/she is deleted. Below is an activity diagram to illustrate this point.
Design considerations
Aspect: How to keep track of the person whose assignment list is displayed:
-
Alternative 1 (current choice): use a reference to point to person whose assignments should be displayed
- Pros: Easy to implement.
- Cons: Ignoring the property of
UniqueAssignmentListthat prevents duplicateAssignmentfrom being stored, this method will be limited to displaying a particular person’s assignments. Difficult to extend to displayingAssignmentobjects of multiplePersonobjects.
-
Alternative 2:
Personclass store an additional attributeboolean isActivePerson.- Pros: Can toggle between multiple persons.
- Cons:
isActivePersonmay not be a suitable property ofPersonclass since it may not be the responsibility ofPersonto remember whether it is theactivePerson.
Give feature
Implementation
The give command allows users to add the specified assignment to a particular person is stored in the model.
Person who already has the specified assignment will not have a duplicated assignment added to him. The
command is abstracted as AddAssignmentCommand and extends Command. When the user inputs the command,
Command#execute is called and returns a CommandResult.
Given below is an example usage scenario and how the AddAssignmentCommand is executed.
Step 1. The user executes list command to see the current list of persons.
Step 2. The user executes give 2 d/Assignment 1 by/ 03/11/2021 command to add assignment to the second person in
the specified module. When Command#execute is called, the give 2... command will filter out persons in the currently
displayed list with INDEX 2 and add the specified assignment to this person if he or she exists and does
not have that assignment.
INDEX does not exist, it will return an error to the user.
The following sequence diagram shows how the give command is executed:
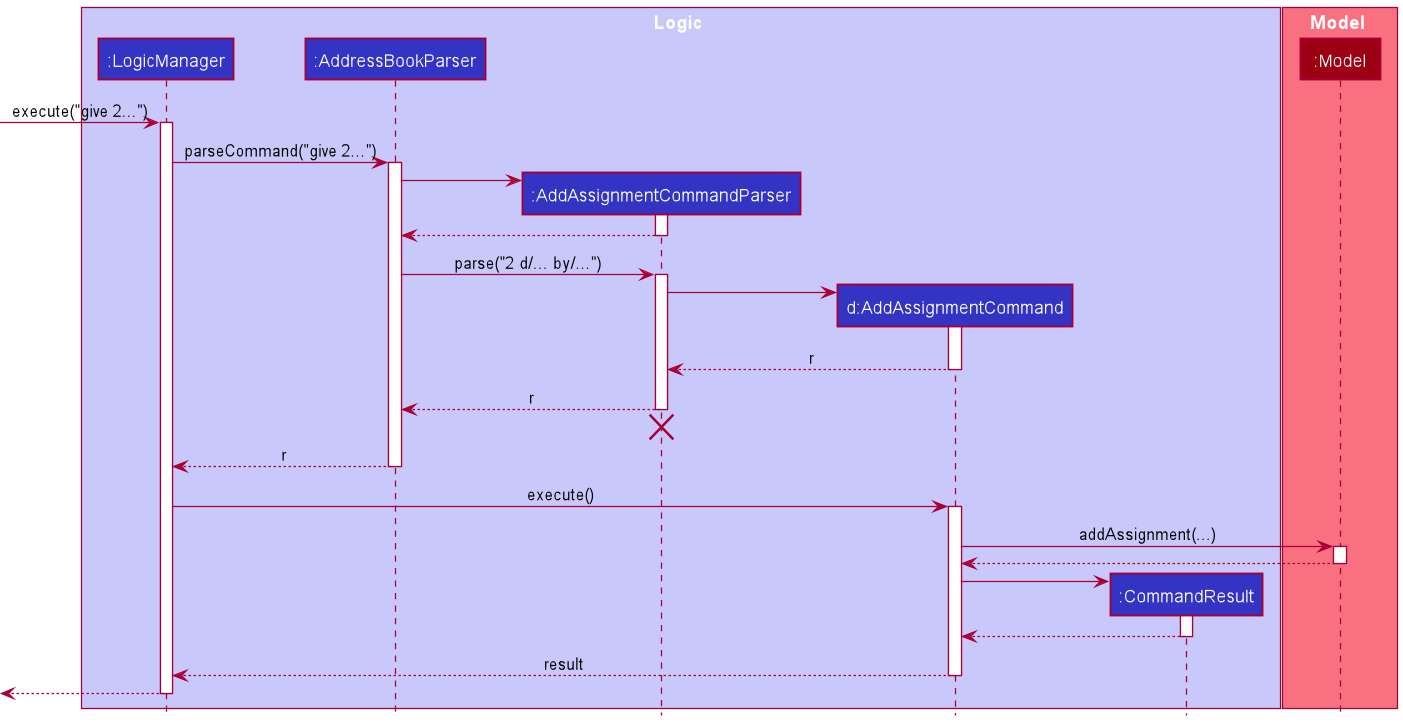
AddAssignmentCommand
should end at the destroy marker (X) but due to a limitation of PlantUML, the lifeline reaches the end of diagram.
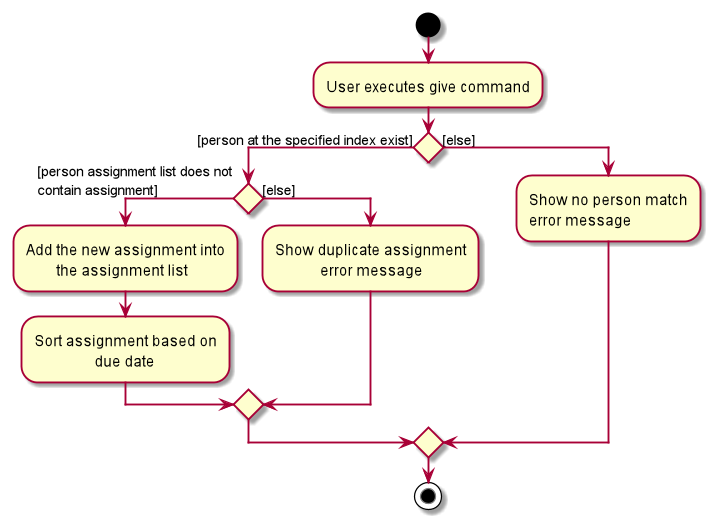
The following activity diagram summarizes what happens when a user executes the give command:
Design considerations
Aspect: Adds an assignment to a person in the currently displayed list or to any other person in storage:
-
Alternative 1 (current choice): Add an assignment to a person in the currently displayed list.
- Pros: If the displayed list is shorter, the addition of assignments will be faster.
- Cons: User has to ensure that the desired person is displayed on the displayed contact list first before adding of assignment.
-
Alternative 2: Add an assignment to any person in the storage.
- Pros: Allows user to add assignment to a particular person even when he is not visible in the list.
- Cons: Might take longer to execute.
- Considering the fact that the
givecommand is meant for users to add assignments to visible persons in contact list, - Alternative 1 was chosen as it meets this specification. Moreover, it will not duplicate the assignment for persons who already have the assignment. Alternative 1 requires an additional effort for user to ensure the person who the user want to give the assignment to is actually stored in the contact list but not displayed, which may lead to the user giving assignments to the wrong person.
Giveall feature
Implementation
The giveall command allows users to add the specified assignment to all persons in the same module. Persons who already
have the specified assignment will not have a duplicated assignment added to them. The command is abstracted as
AddAssignmentToAllCommand and extends Command. When the user inputs the command, AddAssignmentToAllCommand#execute() is called and returns a CommandResult.
When AddAssignmentToAllCommand#execute() is called, AddAssignmentToAllCommand checks if any persons in AddressBook has the specified
assignment already. To avoid any inconsistencies in the specified assignment and any existing assignment with the same Description,
AddAssignmentToAllCommand#execute() calls AddAssignmentToAllCommand#getAssignmentIfExists(List<Person> personListWithAssignment)
to check if any persons contain an assignment with the same Description as the specified assignment. If such an assignment
exists, a check is done to make sure that the DueDate field of the specified assignment and the existing assignment are
the same. Additionally, the Description field of the added assignment will follow that of the existing assignment to
prevent any inconsistencies in letter cases. The assignment will then be added to all persons who do not have the assignment.
Additionally, if all persons in the module already have the specified assignment, it will return an error to the user as well.
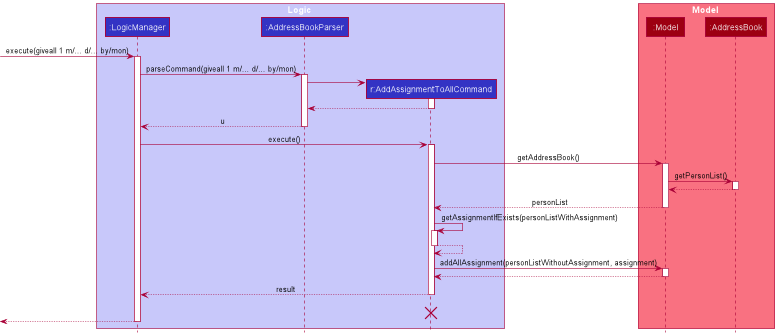
Given below is an example usage scenario and how the AddAssignmentToAllCommand is executed.
Step 1. The user executes giveall m/CS2100 d/Assignment 2 by/ 03/10/2021 command to add Assignment 2 to all persons in
the module CS2100 for the first time. When AddAssignmentToAllCommand#execute() is called, AddAssignmentToAllCommand will filter out persons in AddressBook
with the module field CS2100. Since no persons have this assignment, it is added for all persons in CS2100.
Step 2. The user now decides to add another person in the module CS2100 as this person was accidentally left out earlier.
The user executes add Alice Koh m/CS2100 e/e2716238@u.nus.edu to add the person in.
Step 3. The user wants to give this person the assignment he previously gave to the other persons in CS2100. The user
executes giveall m/CS2100 d/assignment 2 by/ 03/10/2021. Like Step 1, when AddAssignmentToAllCommand#execute() is called,
AddAssignmentToAllCommand will filter out persons in AddressBook with the module field CS2100. However, since
some persons in CS2100 already have Assignment 2, the existing assignment will be returned when
AddAssignmentToAllCommand#getAssignmentIfExists(List<Person> personListWithAssignment) is called. Since the DueDate of
both the specified and existing assignment are 03/10/2021, no error message will be thrown. Assignment 2 will then be added
for all persons in CS2100 who does not have it yet.
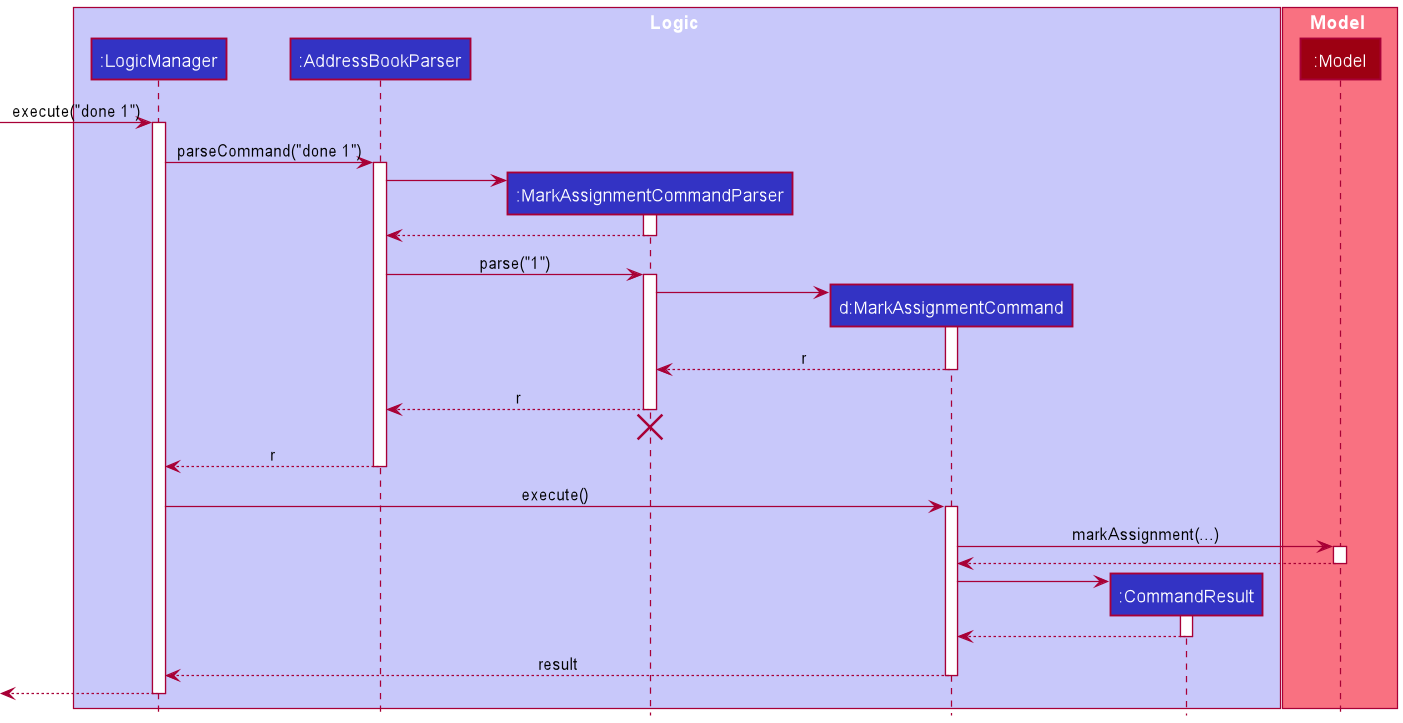
The following sequence diagram shows how giveall m/CS2100 d/assignment 2 by/ 03/10/2021 is executed:
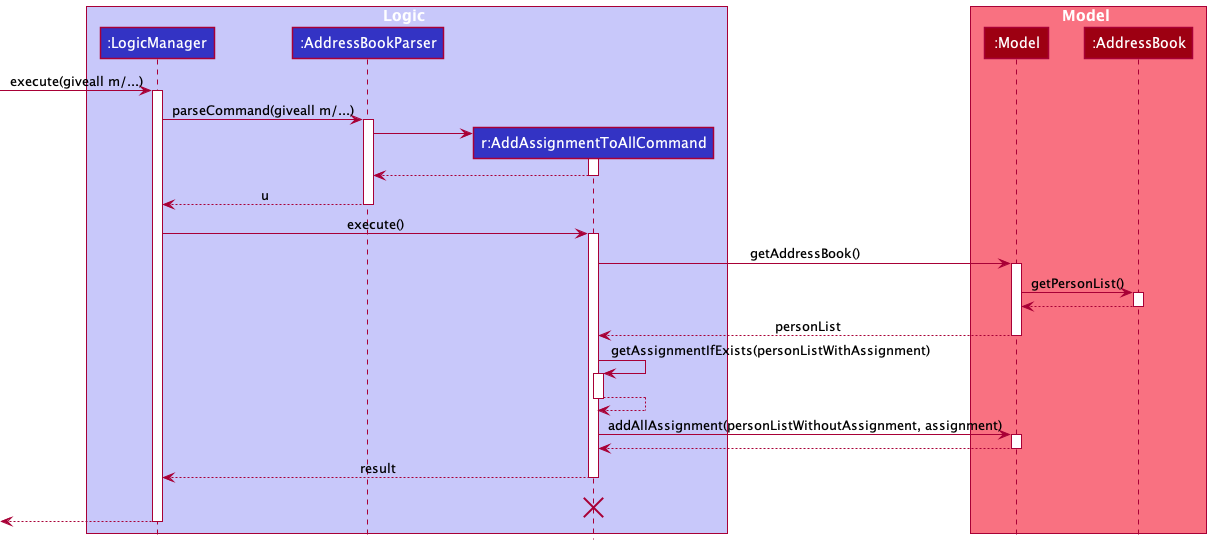
AddAssignmentToAllCommand
should end at the destroy marker (X) but due to a limitation of PlantUML, the lifeline reaches the end of diagram.
The following activity diagram summarizes what happens when a user executes the giveall command:
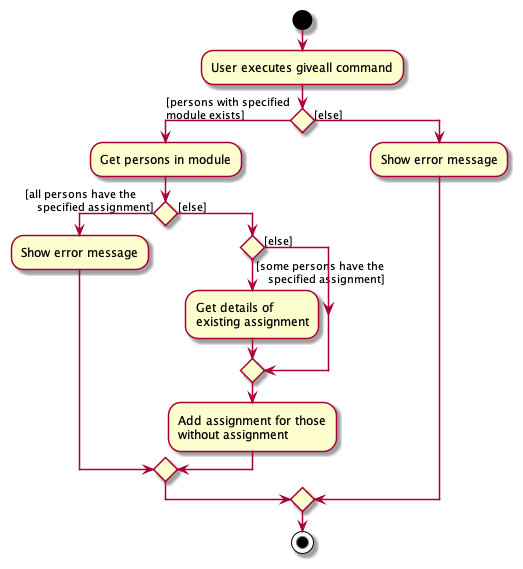
Design considerations
Aspect: Adds assignment to persons in the specified module who are in the currently displayed list or to all persons in the specified module:
-
Alternative 1: Adds assignment to persons in the specified module who are in the currently displayed list
- Pros: Allows user to add assignment to a more specific group of persons
- Cons: User has to carry out
listcommand first if addition of assignments is desired for all persons
-
Alternative 2 (current choice): Adds assignment to all persons in the specified module
- Pros: Allows user to add assignment to all persons even when some persons are not displayed in the list
- Cons: Less flexibility in terms of the choice of persons to add assignments to
- Considering the fact that the
giveallcommand is meant for users to add assignments to all persons in the specified module, alternative 2 was chosen as it meets this specification. Moreover, the existence of thegivecommand which allows users to add an assignment to a specific person suggests that thegiveallcommand might provide better utility for users if it allows for the addition of assignments to a bigger group of persons.
Done feature
Implementation
The done command allows users to mark the specified assignment of a particular person in model.
It is abstracted as MarkAssignmentCommand and extends Command. When the user inputs the command,
Command#execute is called and returns a CommandResult.
Given below is an example usage scenario and how the MarkAssignmentCommand is executed.
Step 1. The user executes list command to see the current list of persons.
Step 2. The user executes done 1 command to mark the first assignment of the currently displayed assignment list as done. When Command#execute is called,
the done 1 command will filter out assignments with INDEX 1 and mark the specified assignment as completed
if assignment of INDEX 1 exists in the currently displayed assignment list.
The following sequence diagram shows how the done command is executed:
MarkAssignmentCommand
should end at the destroy marker (X) but due to a limitation of PlantUML, the lifeline reaches the end of diagram.
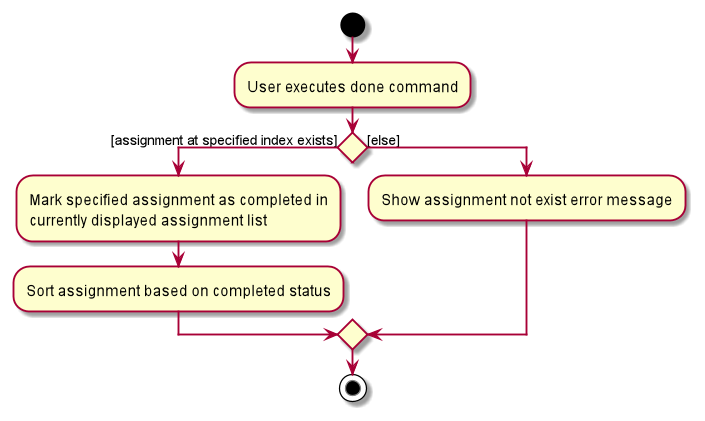
The following activity diagram summarizes what happens when a user executes the done command:
Design considerations
Aspect: Marks assignment of a person in the currently displayed list as done or for any person in storage model:
-
Alternative 1: (current choice) Marks assignment in the currently displayed assignment list as completed.
- Pros: Allows for a safer mark of assignments.
- Cons: User has to ensure that the desired assignment is displayed on the displayed assignment list first before marking the assignment as completed.
-
Alternative 2: Marks an assignment as completed of the specified person, by in putting the name with the command.
- Pros: Allows user to mark assignment of a person without the need of additional commands.
- Cons: User may not be certain about which person’s assignment to mark if several of them has completed assignment and likely to remember the wrong person name if the current person displayed list is not shown.
- Considering the fact that TA2 is designed to be user-friendly in managing student submissions, alternative 1 is
chosen. The potential undesired mark of assignments in alternative 2 means the user has to manually recover the
marked assignment by undoing and marking assignment again. Compared to the additional time taken to execute the
listcommand in alternative 1, it may take up much more time.
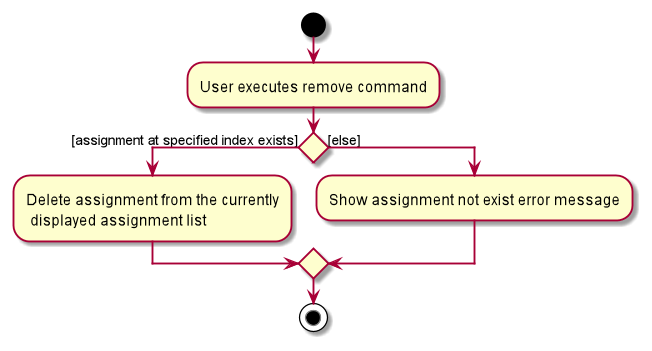
Remove feature
Implementation
The remove command allows users to remove the specified assignment of a particular person in model.
It is abstracted as DeleteAssignmentCommand and extends Command. When the user inputs the command,
Command#execute is called and returns a CommandResult.
Given below is an example usage scenario and how the DeleteAssignmentCommand is executed.
Step 1. The user executes list command to see the current list of persons.
Step 2. The user executes remove 1 command to remove the first assignment of a person whose assignments are currently displayed. When Command#execute
is called, the remove 1 command will filter out the assignment in the currently displayed assignment list with the INDEX 1 and remove
the assignment if there is an assignment at that INDEX in assignment list.
INDEX, it will return an error to the user.
The following sequence diagram shows how the remove command is executed:
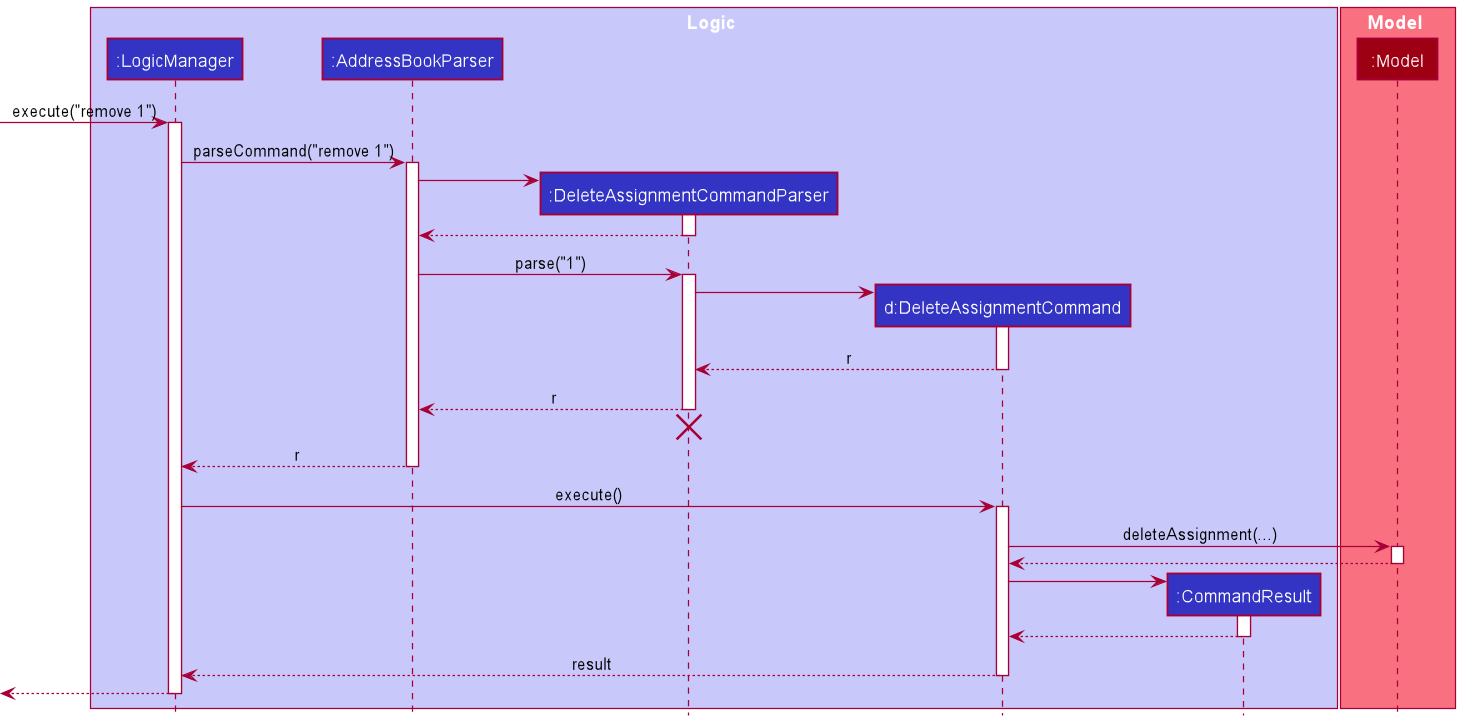
DeleteAssignmentCommand
should end at the destroy marker (X) but due to a limitation of PlantUML, the lifeline reaches the end of diagram.
The following activity diagram summarizes what happens when a user executes the remove command:
Design considerations
Aspect: Deletes assignment of a person in the currently displayed list or for any person in storage:
-
Alternative 1: (current choice) Deletes assignment of a person in the currently displayed list.
- Pros: Allows for a safer delete of assignments.
- Cons: User has to ensure that the desired assignment is displayed on the displayed assignment list first before deleting that assignment.
-
Alternative 2: Deletes the assignment of the specified person, by inputting their name with the command.
- Pros: Allows user to delete assignment of a person without the need of additional commands.
- Cons: User may not be certain about which person’s assignment to delete if several of them have completed the assignment and likely to remember the wrong person name if the currently displayed contact list is not shown.
- Considering the fact that TA2 is designed to be efficient in managing student submissions, alternative 1 is
chosen. The potential undesired deletion of assignments in alternative 2 means the user has to manually recover the
deleted assignment by adding the assignment again. Compared to the additional time taken to execute the
listcommand in alternative 1, it may take up much more time.
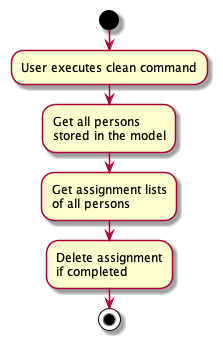
Clean feature
Implementation
The clean command allows users to remove all completed assignment from all persons.
It is abstracted as CleanAssignmentCommand and extends Command. When the user inputs the command,
Command#execute is called and returns a CommandResult.
Given below is an example usage scenario and how the CleanAssignmentCommand is executed.
Step 1. The user executes list command to see the current list of persons.
Step 2. The user executes clean command to remove all the completed assignments.
When Command#execute is called, the clean command will get the assignment list of all persons in the model and
remove all assignments with the completed status.
The following sequence diagram shows how the clean command is executed:
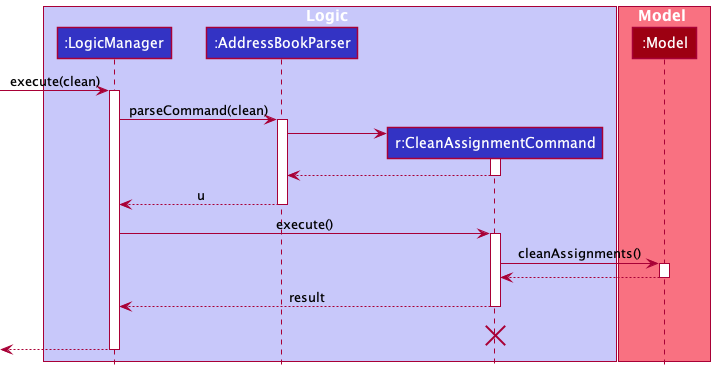
CleanAssignmentCommand
should end at the destroy marker (X) but due to a limitation of PlantUML, the lifeline reaches the end of diagram.
Step 3. The user executes show 1 to check that all completed assignments has been removed for the first person.
The following activity diagram summarizes what happens when a user executes the clean command:
Design considerations
Aspect: Deletes completed assignments of person with assignments currently displayed or for all persons:
-
Alternative 1: Deletes completed assignments of person with assignments currently displayed
- Pros: Allows for a safer delete of assignments
- Cons: User has to carry out
show INDEXcommand for every person if deletion of assignments is desired for all persons
-
Alternative 2(current choice): Deletes completed assignment of all persons
- Pros: Allows user to delete assignment of all persons without the need of additional commands
- Cons: Undesired deletion of assignment of persons not in displayed list may occur
- Considering the fact that TA2 is designed to be efficient in managing student submissions, alternative 2 is
chosen. When the list of persons increase to considerable numbers, deletion of completed assignments will require the user
to input an additional command for each person. Bearing in mind that users make use of the
cleancommand to remove completed assignments that they no longer want to view, alternative 2 does this job more efficiently. Although there may be completed assignments that users want to keep in the list which they accidentally delete, there is theundocommand which allows the user to retrieve the desired assignments easily.
Undo/redo feature
Implementation
The undo/redo mechanism is facilitated by VersionedAddressBook. It extends AddressBook with an undo/redo history, stored internally as an addressBookStateList and currentStatePointer. Additionally, it implements the following operations:
-
VersionedAddressBook#commitAddressBook()— Saves the current address book state in its history. -
VersionedAddressBook#undo()— Restores the previous address book state from its history. -
VersionedAddressBook#redo()— Restores a previously undone address book state from its history.
These operations are exposed in the Model interface as Model#commitAddressBook(), Model#undoAddressBook() and Model#redoAddressBook() respectively.
Given below is an example usage scenario and how the undo/redo mechanism behaves at each step.
Step 1. The user launches the application for the first time. The VersionedAddressBook will be initialized with the initial address book state, and the currentStatePointer pointing to that single address book state.
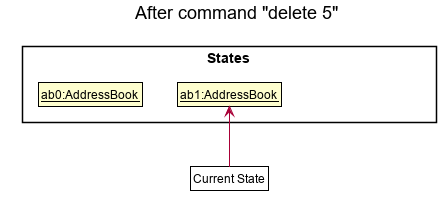
Step 2. The user executes delete 5 command to delete the 5th person in the address book. The LogicManager instance calls Model#commitAddressBook(), causing the modified state of the address book after the delete 5 command executes to be saved in the addressBookStateList, and the currentStatePointer is shifted to the newly inserted address book state.
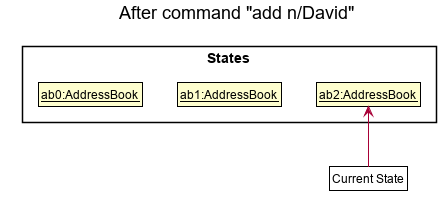
Step 3. The user executes add n/David … to add a new person. The same LogicManager instance calls Model#commitAddressBook(), causing another modified address book state to be saved into the addressBookStateList.
Model#commitAddressBook(), so the address book state will not be saved into the addressBookStateList.
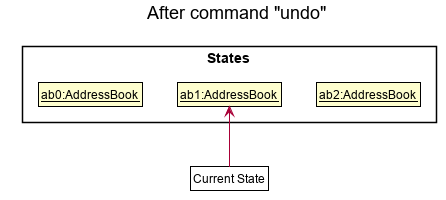
Step 4. The user now decides that adding the person was a mistake, and decides to undo that action by executing the undo command. The undo command will call Model#undoAddressBook(), which will shift the currentStatePointer once to the left, pointing it to the previous address book state, and restores the address book to that state.
The following sequence diagram shows how the undo operation works:
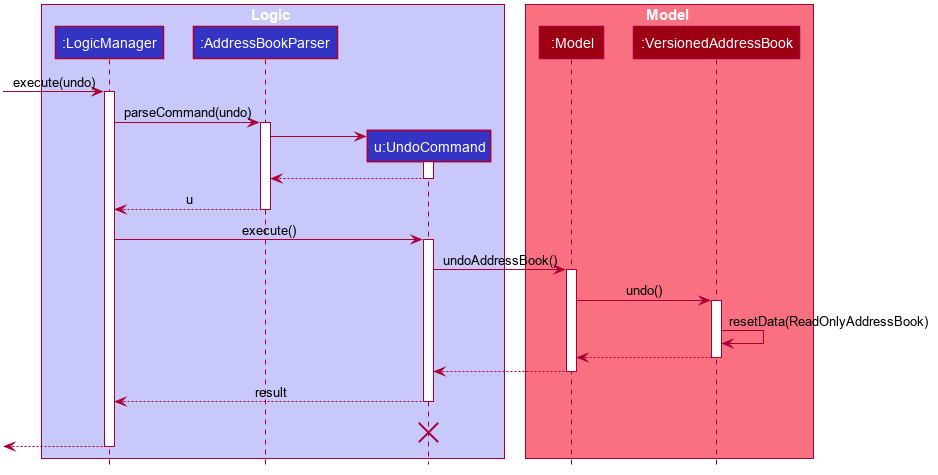
UndoCommand should end at the destroy marker (X) but due to a limitation of PlantUML, the lifeline reaches the end of diagram.
The redo command does the opposite — it calls Model#redoAddressBook(), which shifts the currentStatePointer once to the right, pointing to the previously undone state, and restores the address book to that state.
currentStatePointer is at index addressBookStateList.size() - 1, pointing to the latest address book state, then there are no undone AddressBook states to restore. When redo command executes Model#redoAddressBook() it will internally check if this is the case. If so, it will return an error to the user rather than attempting to perform the redo.
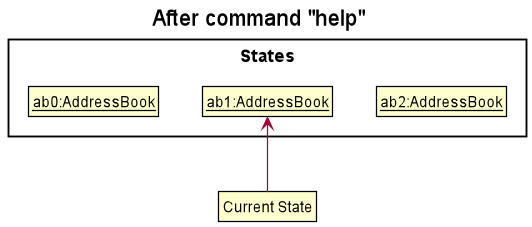
Step 5. The user then decides to execute the command help. Commands that do not modify the address book, such as help, will usually not call Model#commitAddressBook(), Model#undoAddressBook() or Model#redoAddressBook(). Thus, the addressBookStateList remains unchanged.
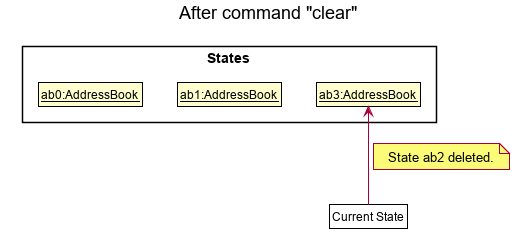
Step 6. The user executes clear, which calls Model#commitAddressBook(). Since the currentStatePointer is not pointing at the end of the addressBookStateList, all address book states after the currentStatePointer will be purged. Reason: It no longer makes sense to redo the add n/David … command. This is the behavior that most modern desktop applications follow.
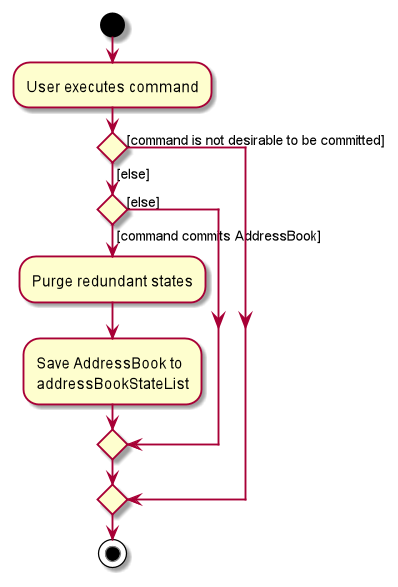
The following activity diagram summarizes what happens when a user executes a new command:
Design considerations
Aspect: How undo & redo executes:
-
Alternative 1 (current choice): Saves the entire address book.
- Pros: Easy to implement.
- Cons: May have performance issues in terms of memory usage.
-
Alternative 2: Individual command knows how to undo/redo by
itself.
- Pros: Will use less memory (e.g. for
delete, just save the person being deleted). - Cons: We must ensure that the implementation of each individual command are correct.
- Pros: Will use less memory (e.g. for
Friendlier Command Inputs
In striving to adopt a more user-centric approach in command recognition, additional commands are included on top of the original commands which stuck by a strict and predefined prefix. This offered very little flexibility to our users in an event they make a mistake.
Here are the commands that currently support a friendly input command:
givegiveall
give and giveall command classes will not create “Give” classes but instead:
The give command results in the creation of the AddAssignmentCommandParser class whilst the giveall command results
in the creation of the AddAssignmentToAllCommandParser.
The give command has the sole purpose of adding a single assignment to an individual in the list.
The giveall command has the sole purpose of adding a single assignment to all individuals under the same module in the list.
The following table contains the new friendly commands that a user may provide, instead of the original command inputs.
| Friendly Command | Corresponding Command | Example Usages |
|---|---|---|
| tmr | sets the date to be tomorrow | give n/name d/description by/tmr |
| today | sets the date to be the current date | give n/name d/description by/today |
| week | sets the date to be a week from now | give n/name d/description by/week |
| mon | sets the date to be the upcoming Monday | give n/name d/description by/mon |
| tue | sets the date to be the upcoming Tuesday | give n/name d/description by/tue |
| wed | sets the date to be the upcoming Wednesday | give n/name d/description by/wed |
| thu | sets the date to be the upcoming Thursday | give n/name d/description by/thu |
| fri | sets the date to be the upcoming Friday | give n/name d/description by/fri |
| sat | sets the date to be the upcoming Saturday | give n/name d/description by/sat |
| sun | sets the date to be the upcoming Sunday | give n/name d/description by/sun |
When the user enters a command with the friendly command input, the AddressBookParser class will recognize the command
and parse the entered command.
If the command the user chose is give, this triggers the AddAssignmentCommandParser#parse
method to be called with the user input arguments. If the command chosen is giveall, this
triggers the AddAssignmentToAllCommandParser#parse method to be called instead.
From there, each individual argument token is parsed and for the friendly command, it will be
recognized within the DueDate class as a date with a friendly command format. This then calls
the Java library TemporalAdjusters class to return a LocalDate instance that represents the
desired friendly command input date.
From here, the AddAssignmentCommand class is then instantiated if the user command is give, or
conversely, the AddAssignmentToAllCommand class.
Finally, the results are then actualized by the Model component.
The following activity diagram shows the possible paths whilst a user adds an assignment using give:
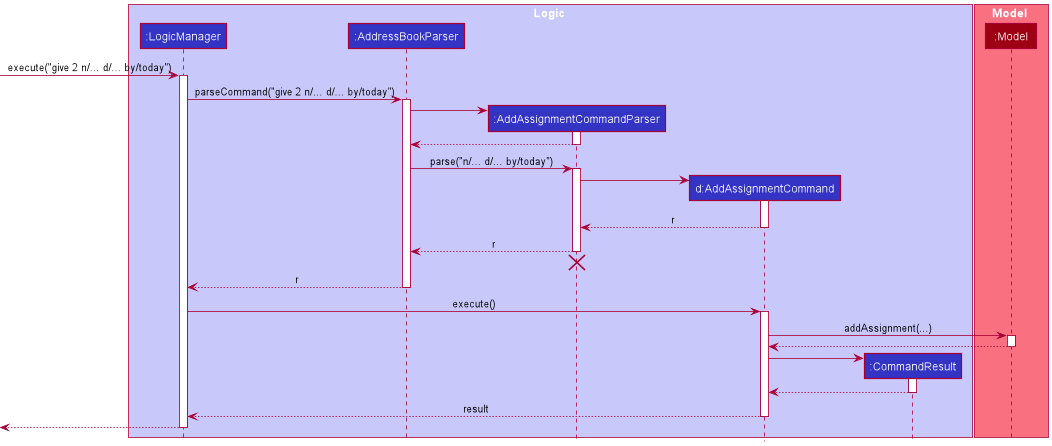
The following sequence diagram shows the logic sequence of an AddAssignment command execution:
The following activity diagram shows the possible paths whilst a user adds an assignment using giveall:
The following sequence diagram shows the logic sequence of an AddAssignmentToAll command execution:
AddAssignmentToAllCommand
should end at the destroy marker (X) but due to a limitation of PlantUML, the lifeline reaches the end of diagram.
Design considerations
Aspect: Rigidity in allowing users to add assignments correctly yet handle multiple short-form user inputs:
-
Alternative 1 (current choice): Allows users to add based on format and some friendly commands
- Pros: Allows for a safer addition of assignment, ensuring strict adherence to format
- Cons: User has to memorize the command usage or get it wrong the first time to view the error message
-
Alternative 2: Simplify the rigid commands and make all commands user-friendly
- Pros: Users can perform more powerful addition of assignments without having to type too much or following too strict of a guideline
- Cons: Requires the application to recognize a lot of different words, be it short or long form, to allow maximum user-friendliness, which may not be too feasible to achieve
[Proposed] Friendly Commands
find
(more aspects and details of implementation to come)
Documentation, logging, testing, configuration, dev-ops
Appendix: Requirements
Product scope
Target user
TA2 is developed for Teaching Assistants (TA) in the School of Computing (SoC) at the National University of Singapore (NUS).
Profile:
- has a need to consolidate and organise student information
- has a need to manage student assignments
- has little time to organise information manually
- is familiar with using CLI applications
- can type fast
Value proposition
TA2 offers a convenient way for SoC TAs to manage student assignments in an efficient manner. With TA2, they will no longer need to have to rely on inefficient workarounds like Excel or Notepad. As users who can type fast, they will be able to manage their students’ information and allocated assignments much faster than when using a mouse/GUI driven app.
TA2 does not support management of assignments of a particular student across multiple modules (i.e. a student can only be under a single module).
User stories
Priorities: High (must have) - * * *, Medium (nice to have) - * *, Low (unlikely to have) - *
| Priority | As a … | I want to … | So that I can… |
|---|---|---|---|
* * * |
TA using TA2 for the first time | see all commands available | recall commands and use them properly when I forget how to use the app |
* * * |
TA | add information of a student | view a student’s information |
* * * |
TA | delete a student | remove student entries that I no longer need |
* * * |
TA | find a person by name or module | locate details of persons without having to go through the entire list |
* * * |
TA | assign tasks to students | - |
* * * |
TA | delete tasks assigned before | remove assignments that I do not need to view anymore |
* * * |
TA | mark students’ tasks as done | record students’ progress more easily |
* * * |
responsible TA | track students’ progress on their assignments | identify and reach out to those who need help |
* * * |
TA | list all students I am teaching | ensure I added right and correct number of students |
* * * |
TA | clear all student information in TA2 | use TA2 over many semesters |
* * |
TA for several modules | organize student assignments according to module | manage assignments of students from different modules in an organised manner |
* * |
TA with many students | organise my students in a systematic fashion | locate a student easily |
* * |
responsible TA | be notified when certain assignments are due soon | remind students who have not submitted their assignments yet |
* * |
clumsy TA | undo actions | recover information that I accidentally delete |
* * |
TA | assign a similar task to all students at once | save time manually assigning one by one |
* * |
TA | remove all assignments that are completed | save time manually removing each assignment one by one |
* |
TA teaching online | access the web links used for teaching | access information from teaching websites immediately |
* |
busy TA | list people whose information I access frequently | save time searching their name whenever I start the application |
* |
TA with many assignments to manage | see assignments that need my attention the most at the present moment | I can prioritise which assignment to attend to |
Use cases
(For all use cases below, the System isTA^2 and the Actor is the user, unless specified otherwise)
Use case: UC01 - Add a person
MSS
- User enters a new person’s information.
-
TA2 shows the person is added.
Use case ends.
Extensions
-
1a. The given command format is invalid, or the person’s name or email is already in the list.
-
1a1. TA2 shows an error message.
Use case resumes at step 1.
-
Use case: UC02 - Find a person
MSS
- User requests to find a person with the specified keyword(s).
-
TA2 shows a list of persons with matching keyword(s).
Use case ends.
Extensions
-
1a. The format of the command is invalid.
-
1a1. TA2 shows an error message.
Use case resumes at step 1.
-
-
2a. No persons match the specified keyword(s).
Use case ends.
Use case: UC03 - Delete a person
MSS
- User requests to list persons.
- TA2 shows a list of persons.
- User requests to delete a specific person in the list.
-
TA2 deletes the person.
Use case ends.
Extensions
-
2a. The list is empty.
Use case ends.
-
3a. The given index is invalid.
-
3a1. TA2 shows an error message.
Use case resumes at step 2.
-
Use case: UC04 - Edit a person
MSS
- User requests to edit a person’s name and email in the list.
-
TA2 shows that the person’s information has been edited.
Use case ends.
Extensions
-
1a. The format of the command or the index is invalid, or there already exists a person with the same name and email.
-
1a1. TA2 shows an error message.
Use case resumes at step 1.
-
Use case: UC05 - Give an assignment
MSS
- User enters the assignment information.
-
TA2 shows the assignment is added.
Use case ends.
Extensions
-
1a. The format of the command is invalid, or the assignment already exists in that person’s assignment list.
-
1a1. TA2 shows an error message.
Use case resumes at step 1.
-
Use case: UC06 - Remove an assignment
MSS
- User requests to show assignments of a person.
- TA2 shows a list of assignments.
- User requests to delete a specific assignment in the list.
-
TA2 deletes the assignment.
Use case ends.
Extensions
-
2a. The list is empty.
Use case ends.
-
3a. The given index is invalid.
-
3a1. TA2 shows an error message.
Use case resumes at step 2.
-
Use case: UC07 - Mark an assignment as done
MSS
- User requests to show assignments of a person.
- TA2 shows a list of assignments.
- User requests to mark a specific assignment in the list as done.
-
TA2 shows the assignment is done.
Use case ends.
Extensions
-
2a. The list is empty.
Use case ends.
-
3b. The given index is invalid, or the assignment has already been mark completed.
-
3b1. TA2 shows an error message.
Use case resumes at step 1.
-
Non-Functional Requirements
- Should work on any mainstream OS as long as it has Java
11or above installed. - Should be able to hold up to 200 persons, each with 100 assignments, without a noticeable sluggishness in performance for typical usage.
- A user with above average typing speed (approximately 70 words per minute) for regular English text (i.e. not code, not system admin commands) should be able to accomplish most of the tasks faster using commands than using the mouse.
- System should respond within 2 seconds of user request.
- Should be a single user product.
- Data should be stored in a human editable text file.
- Data cannot be stored in DBMS.
- Size of products should not exceed 100 MB.
- No broken links should be present.
- The user interface should be intuitive enough for users who are not IT-savvy.
- Commands should not be cumbersome to use.
Glossary
- Mainstream OS: Windows, Linux, Unix, OS-X
- Person: Synonymous with student as of v1.4
- e/: Symbol for a requirement to state email address
- m/: Symbol for a requirement to state the module
- n/: Symbol for a requirement to state a name
- t/: Symbol for a requirement to state a tag
- TA: Abbreviation for teaching assistant
- UC: Abbreviation for use case
- SoC: Abbreviation for School of Computing
- CLI: Abbreviation for Command Line Interface
Appendix: Instructions for manual testing
Given below are instructions to test the app manually.
Launch and shutdown
-
Initial launch
-
Download the jar file and copy into an empty folder.
-
Navigate to the folder using your command prompt.
-
Launch the jar file using the
java -jar ta2.jar. -
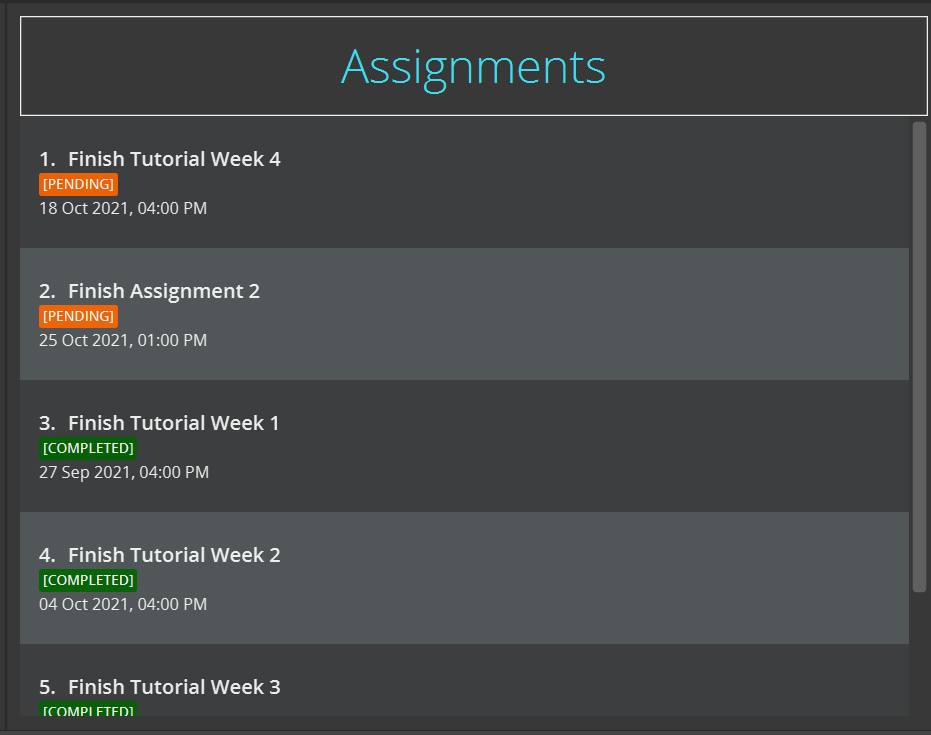
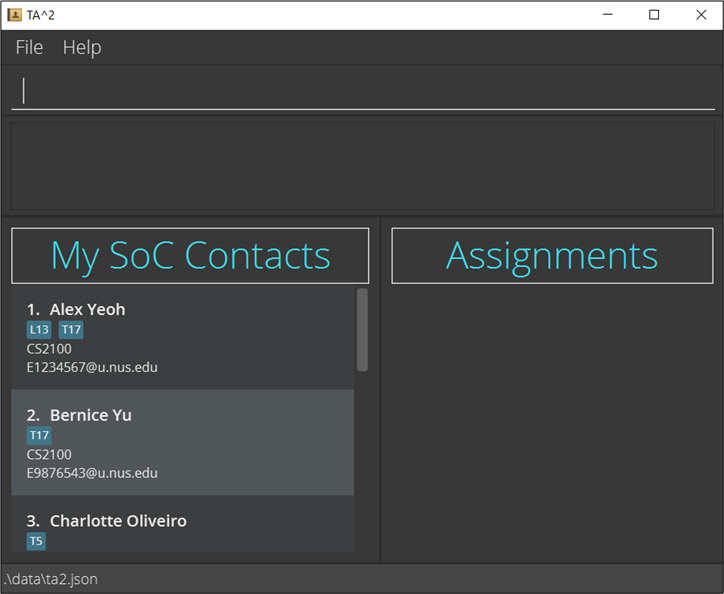
Expected: Shows the GUI with a set of sample contacts. No assignments are displayed under the Assignments panel. The window size may not be optimum. The image below is the window you will see upon starting TA2.
-
-
Saving window preferences
-
Resize the window to an optimum size. Move the window to a different location. Close the window.
-
Re-launch the app by double-clicking the jar file.
Expected: The most recent window size and location is retained.
-
Viewing Help
- Test case:
help
Expected: Pops up a help window as shown in the image below. Success message shown in the status message.

- Click on the Copy URL button and paste the link in your web browser.
Expected: URL leads you to the user guide of TA2.
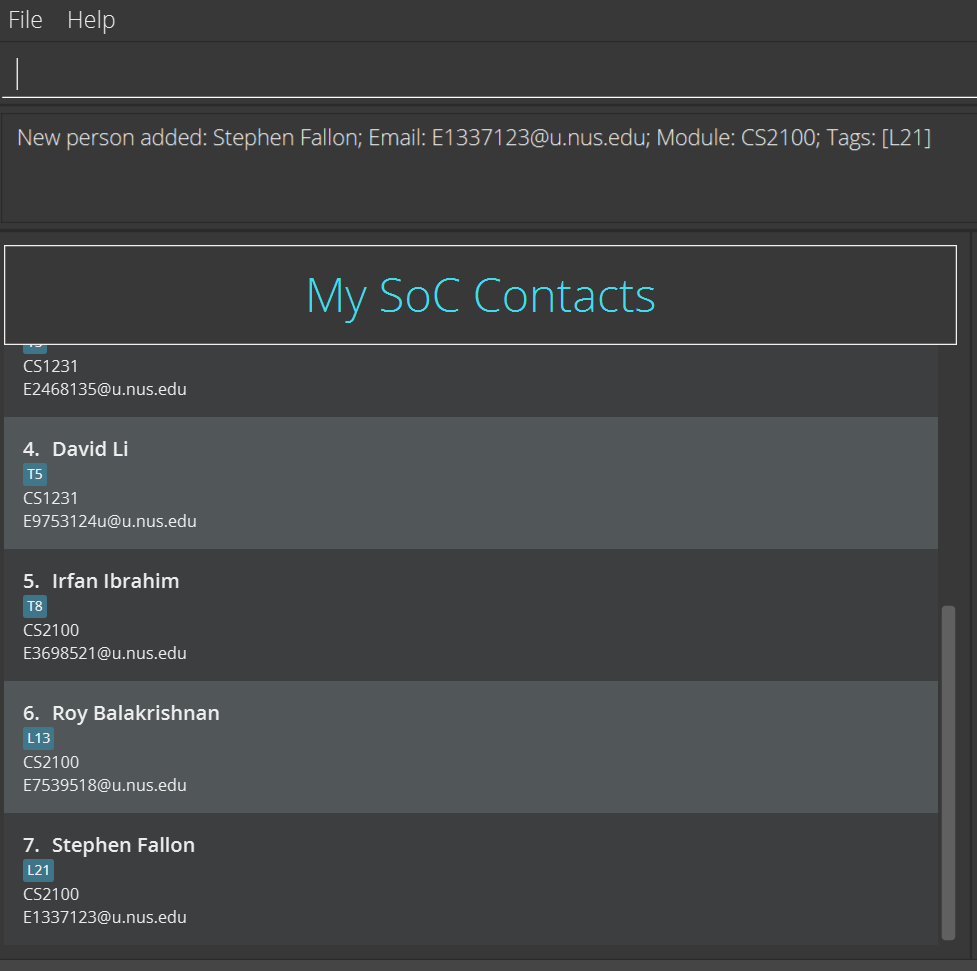
Adding a person
-
Adding a person while all persons are being shown.
-
Prerequisites: List all persons using the
listcommand. Ensure there is no person named Stephen Fallon in the list before proceeding. -
Test case:
add n/Stephen Fallon m/CS2100 e/E1337123@u.nus.edu t/L21
Expected: Appends added contact to your SoC contact list. Details of the added contact shown in the status message. The image below shows the result of this command on the contact list if you started with the 6 people from the sample data.
-
-
Test case: Repeat
add n/Stephen Fallon m/CS2100 e/E1337123@u.nus.edu t/L21again
Expected: No person is added. Error details shown in the status message because the peron, Stephen Fallon, already exists in the list. -
Adding a person with the same email as a person in the contact list.
-
Prerequisites: Added Stephen Fallon in the previous test case. Ensure that there are no persons named Ah Beng. If not, feel free to choose a different name that is not in the contact list.
-
Test case:
add n/Ah Beng m/CS2100 e/E1337123@u.nus.edu t/L21
Expected: No person is added. Error details shown in the status message because the email, E1337144@u.nus.edu, already exists in the list.
-
-
Adding a person while only some persons are being shown.
-
Prerequisites: Ensure there are at least two persons in your contact list. Display a subset of persons using
find n/Stephen Falloncommand assuming Stephen Fallon is one of the persons in the contact list. Feel free to use thefindcommand for any other persons in your contact list instead. Check that there are no persons named Hawking Einstein in your contact list. -
Test case:
add n/Hawking Einstein m/CS2100 e/E1337144@u.nus.edu t/L30
Expected: Hawking Einstein contact information is appended to your SoC contact list. Details of the added contact will be shown in the status message. The SoC contact list will display all your contacts with Hawking Einstein appended to your contact list.
-
-
Adding a person with missing compulsory fields.
-
Prerequisites: Ensure that no person in your contact list has the name Steve Jobs.
-
Some invalid formats of
addcommand you can try areadd,add m/cs2100 n/Steve Jobsandadd n/Steve Jobs.
Expected: No person is added. Error details shown in the status message due to invalid command format.
-
Finding a person
-
Finding a person while all people are being shown
-
Prerequisites: List all persons using the
listcommand. Multiple people in the list with at least one person named Alice, one person taking the module CS2103T and one person having the tag Lab15. -
Test case:
find n/Alice
Expected: Finds all people with the name Alice.
Even if Alice is a first name or last name, the person will be found and their name and details are shown. -
Test case:
find m/CS2103T
Expected: Finds all people taking the module CS2103T. People found will have their names and details displayed. -
Test case:
find t/Lab15Expected: Finds all people with the tag Lab15. People found will have their names and details displayed. -
Test case:
find n/Alice m/CS2103T
Expected: Finds all people with the name Alice or module CS2103T. People found will have their names and details displayed.
-
-
Finding a person while only some people OR none are being shown
-
Prerequisites: Empty the display list by calling
find n/. This returns an empty list as 0 people will be found. Ensure multiple people in the original list with at least one person named Alice, one person taking the module CS2103T and one person having the tag Lab15. -
Test case:
find t/Lab15Expected: Finds all people with the tag Lab15. Contact List will change from empty and people found will have their names and details displayed. -
Test case:
find t/Lab15 m/CS2103T
Expected: Finds all people with the tag Lab15 or module CS2103T. Contact List will change from empty and people found will have their names and details displayed. -
Test case:
find n/Alice t/Lab15 m/CS2103T
Expected: Finds all people with the name Alice, tag Lab15, or module CS2103T. Contact List will change from empty and people found will have their names and details displayed.
-
-
Finding a person without specifying the prefix inputs.
-
Prerequisites: List all persons using the
listcommand. Multiple people in the list with at least one person named Alice, one person taking the module CS2103T and one person having the tag Lab15. -
Test case:
find t/Expected: Returns an empty list with panel showing “0 persons listed”. -
Test case:
find n/Expected: Returns an empty list with panel showing “0 persons listed”. -
Test case:
find n/ m/Expected: Returns an empty list with panel showing “0 persons listed”. -
Test case:
find n/ m/ t/Expected: Returns an empty list with panel showing “0 persons listed”.
-
-
Finding a person with the wrong module input.
-
Prerequisites: List all persons using the
listcommand. Multiple people in the list with at least one person taking the module CS2103T. -
Test case:
find m/CSSS2103TExpected: Error details shown in the status message since the module prefix format is invalid. -
Test case:
find m/CS210345TExpected: Error details shown in the status message since the module prefix format is invalid. -
Test case:
find m/CS2103TITExpected: Error details shown in the status message since the module prefix format is invalid.
-
-
Incorrect
findcommand usage.-
Test case:
findExpected: Error details shown in the status message since the command format is invalid. -
Test case:
find e/e12345Expected: Error details shown in the status message since the command format is invalid. -
Test case:
find AliceExpected: Error details shown in the status message since the command format is invalid.
-
Listing all Persons
-
Listing all persons when some persons are displayed.
-
Prerequisites: Have multiple persons in contact list. Choose one of the person’s name and use the
findcommand to narrow the search to that person, e.g.find n/Alex Yeohif “Alex Yeoh” is in your contact list. -
Test case:
list
Expected: All persons will be shown in contact list. If you have any assignments displayed under Assignments, they will be cleared. Success message shown in the status message.
-
Deleting a person
-
Deleting a person while all persons are being shown.
-
Prerequisites: List all persons using the
listcommand. Multiple persons in the list. -
Test case:
delete 1
Expected: First contact is deleted from the list. Details of the deleted contact shown in the status message. -
Test case:
delete 0
Expected: No person is deleted. Error details shown in the status message because index has to be a positive integer. -
Test case:
delete x(where x is larger than the list size)
Expected: No person is deleted. Error details shown in the status message because the index is invalid. -
Deleting a person while only some persons are being shown.
-
Prerequisites: List all persons using the
listcommand. Multiple persons in the list. Select one person and search the name using the find command, e.g.find n/Alex Yeoh. -
Test case:
delete 1
Expected: First contact is deleted from the list. Details of the deleted contact shown in the status message. -
Test case:
delete 0
Expected: No person is deleted. Error details shown in the status message because index has to be a positive integer. -
Test case:
delete x(where x is larger than the list size)
Expected: No person is deleted. Error details shown in the status message because the index is invalid. -
Deleting a person without specifying person’s index parameter.
-
Other incorrect delete commands to try:
delete
Expected: Error details shown in the status message since the command format is invalid.
Editing a person
-
Editing a person while all persons are being shown.
-
Prerequisites: There are multiple persons in the contact list (no person called Alex and no email named 15434@163.com).
-
Test case:
edit 1 n/Alex e/15434@163.com m/CS2100
Expected: The first person in the contact list is renamed as Alex, and the email and module of this person changed accordingly to the given. Details of the edited person will be shown in the status message. -
Test case:
edit 2 n/Alex e/11465434@163.com m/CS2100just after last test case.
Expected: No person is edited. Error details shown in the status message since the repeated name is not allowed. -
Test case:
edit 2 n/Alex Yeoh e/15434@163.com m/CS2100just after last test case.
Expected: No person is edited. Error details shown in the status message since the repeated email is not allowed. -
Test case:
edit 2 t/friend t/lab7
Expected: The second person’s tag is replaced with tags called friend and lab7.
-
-
Editing a person while no person is in the contact list.
- Test case:
edit 1 n/Halooredit 1 m/cs1111sor any other combinations of optional fields.
Expected: No person is edited. Error details shown in the status message since the index is invalid.
- Test case:
-
Editing a person while missing compulsory fields.
- Test case: You can try
editoredit 1
Expected: No person is edited. Error details shown in the status message since the format is invalid.
- Test case: You can try
Showing an assignment list
-
Showing assignments while there are multiple people in the contact list.
-
Prerequisites: The current assignment list panel is empty.
-
Test case:
show 0
Expected: No assignments shown in assignment list panel. Error details shown in the status message since the index is invalid. -
Test case:
show 1
Expected: The assignments of the first person in contact list are shown in assignment list panel. -
Test case:
show x(x is any positive number greater than the number of people in the contact list.)
Expected: No assignments shown in assignment list panel. Error details shown in the status message since the index is invalid.
-
-
Showing assignments while there is no person in the contact list.
-
Prerequisites: The current assignment list panel is empty.
-
Test case:
show 1
Expected: No assignments shown in assignment list panel. Error details shown in the status message since the index is invalid.
-
-
Showing assignments while missing compulsory fields.
-
Prerequisites: The current assignment list panel is empty.
-
Test case:
show
Expected: No assignments shown in assignment list panel. Error details shown in the status message since the format is invalid.
-
Giving an assignment
-
Giving an assignment while all assignments of a person are being shown.
-
Prerequisites: There are multiple persons in the contact list and the first person’s assignments are shown already.
-
Test case:
give 1 d/lab2 by/11/11/2021
Expected: lab2 assignment is appended to the first person’s assignment list. Details of the added assignment will be shown in the status message. The assignment list panel will display pending and completed assignments sorted by due date with all pending assignments above completed ones. -
Test case: Repeat
give 1 d/lab2 by/11/11/2021again.
Expected: No assignment is added into the assignment list panel. Error details shown in the status message since no repeated assignments are allowed. -
Test case:
give 2 d/lab2 by/20/12/2021
Expected: lab2 assignment is appended to second person’s assignment list. Details of the added assignment will be shown in the status message. The assignment list panel will display second person’s pending and completed assignments sorted by due date with all pending assignments above completed ones.
-
-
Giving an assignment while assignment list panel is empty.
-
Prerequisites: There are multiple persons in the contact list.
-
Test case:
give 1 d/lab3 by/11/11/2021
Expected: lab3 assignment is appended to the first person’s assignment list. Details of the added assignment will be shown in the status message. The assignment list panel will display the first person’s pending and completed assignments sorted by due date with all pending assignments above completed ones. -
Test case:
give x d/lab3 by/11/11/2021(where x is a number larger than the number of people in the contact list)
Expected: No assignment is added into the assignment list panel. Error details shown in the status message since the index is invalid.
-
-
Giving an assignment while missing compulsory fields.
1.Test case: you can try
give,give d/lab3,give by/11/11/2021and so on.
Expected: No assignment is added into the assignment list panel. Error details shown in the status message since the format is invalid.
Giving an assignment to all persons in a module
-
Giving a new assignment to all persons in a module
-
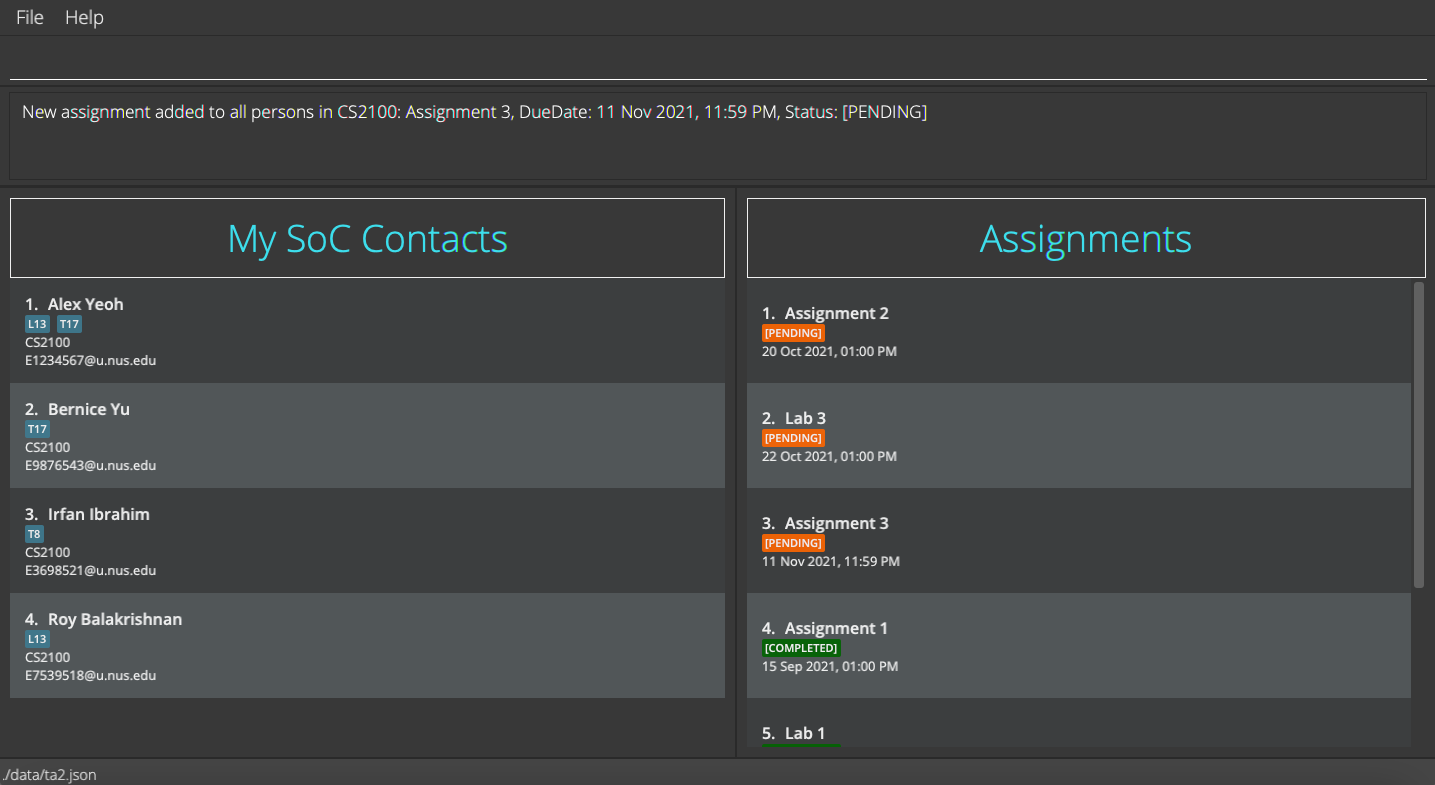
Prerequisites: Have multiple persons in the same module. Filter out the persons in this module, e.g. If these persons are under the module CS2100, execute
find m/CS2100to see all persons in the module CS2100. Ensure that none of these persons have the assignment you wish to give using theshowcommand. -
Test case:
giveall m/CS2100 d/Assignment 3 by/ 11/11/2021
Expected: All persons in the module “CS2100” have “Assignment 3” with due date “11/10/2021” added into their assignment list. Executeshow INDEXcommand to check that all persons have this assignment in their assignment list. If you started with the 6 persons from the sample data and have executed the series of commands described above, you should be able to see the result of the command illustrated in the image below. Note that the image is displaying the assignment list of “Alex Yeoh” asshow 1was executed.
-
Test case: Repeat
giveall m/CS2100 d/Assignment 3 by/ 11/11/2021
Expected: No duplicated assignment should be added for all persons the module CS2100. Error message will be shown as all persons already have the specified assignment. The assignment list of persons should show the same assignments as the one in the previous test case.
-
-
Giving an assignment to some persons without the assignment.
-
Prerequisites: Start with the sample data and filter out the persons in the module CS2100 by executing
find m/CS2100. The person Roy Balakrishnan will not have Assignment 1, while other persons in CS2100 will have this assignment. Executeshow 1to see the details of Assignment 1 in the first person’s assignment list. -
Test case:
giveall m/CS2100 d/Assignment 1 by/ 11/11/2021, 1300
Expected: The specified assignment should not be added to Roy Balakrishnan. Error message will be shown as the specified assignment has a due date of 11/11/2021, 1300, but the due date of Alex Yeoh ‘s assignment is 15/09/2021, 1300. -
Test case:
giveall m/CS2100 d/Assignment 1 by/ 15/09/2021, 0900
Expected: The specified assignment should not be added to Roy Balakrishnan. Error message will be shown as the specified assignment has a due date of 15/09/2021, 1300, but the due date of Alex Yeoh ‘s assignment is 15/09/2021, 0900. -
Test case:
giveall m/CS2100 d/assignment 1 by/ 15/09/2021, 1300
Expected: The assignment Assignment 1 with due date 15/09/2021, 1300 should be added to Roy Balakrishnan. Note that the letter a is capitalised as other persons’ assignment is Assignment 1 with a capitalised a.
-
Marking an assignment
-
Marking an assignment while all assignments of a person are being shown.
-
Prerequisites: There are multiple persons in the contact list and the first person’s assignments (at least one assignment) are already shown.
-
Test case:
done 1
Expected: The first assignment is marked as done in assignment list panel. Details of the marked assignment will be shown in the status message. The assignment list panel will display pending and completed assignments sorted by due date with all pending assignments above completed ones. -
Test case:
done x(where x is a number larger than the number of assignments in the assignment list)
Expected: No assignment is marked. Error details shown in the status message since the index is invalid. -
Test case:
done 0
Expected: No assignment is marked. Error details shown in the status message since the index is invalid.
-
-
Marking an assignment while assignment list panel is empty.
-
Prerequisites: There are multiple persons in the contact list and no person’s assignment list is shown.
-
Test case:
done 1
Expected: No assignment is marked. Error details shown in the status message since the index is invalid.
-
-
Marking an assignment while missing compulsory fields.
- Test case:
done
Expected: No assignment is marked as completed in the assignment list panel. Error details shown in the status message since the format is invalid.
- Test case:
Removing an assignment
-
Removing an assignment while all assignments of a person are being shown.
-
Prerequisites: There are multiple persons in the contact list and the first person’s assignments (at least one assignment) are shown already.
-
Test case:
remove 1
Expected: The first assignment is removed in assignment list panel. Details of the removed assignment will be shown in the status message. The assignment list panel will display pending and completed assignments sorted by due date with all pending assignments above completed ones. -
Test case:
remove x(where x is a number larger than the number of assignments in the assignment list)
Expected: No assignment is removed. Error details shown in the status message since the index is invalid. -
Test case:
remove 0
Expected: No assignment is removed. Error details shown in the status message since the index is invalid.
-
-
Removing an assignment while assignment list panel is empty.
-
Prerequisites: There are multiple persons in the contact list and no person’s assignment list is shown.
-
Test case:
remove 1
Expected: No assignment is removed. Error details shown in the status message since the index is invalid.
-
-
Removing an assignment while missing compulsory fields.
- Test case:
remove
Expected: No assignment is removed from the assignment list panel. Error details shown in the status message since the format is invalid.
- Test case:
Cleaning all completed assignments
-
Prerequisites: Have a mix of completed and pending assignments for several persons. Execute
listto see the list of all persons. -
Test case:
clean
Expected: All completed assignments are removed for all persons. The result of the command is shown in the image below. Note that the assignment panel is showing the assignment list of the first person asshow 1was executed beforeclean.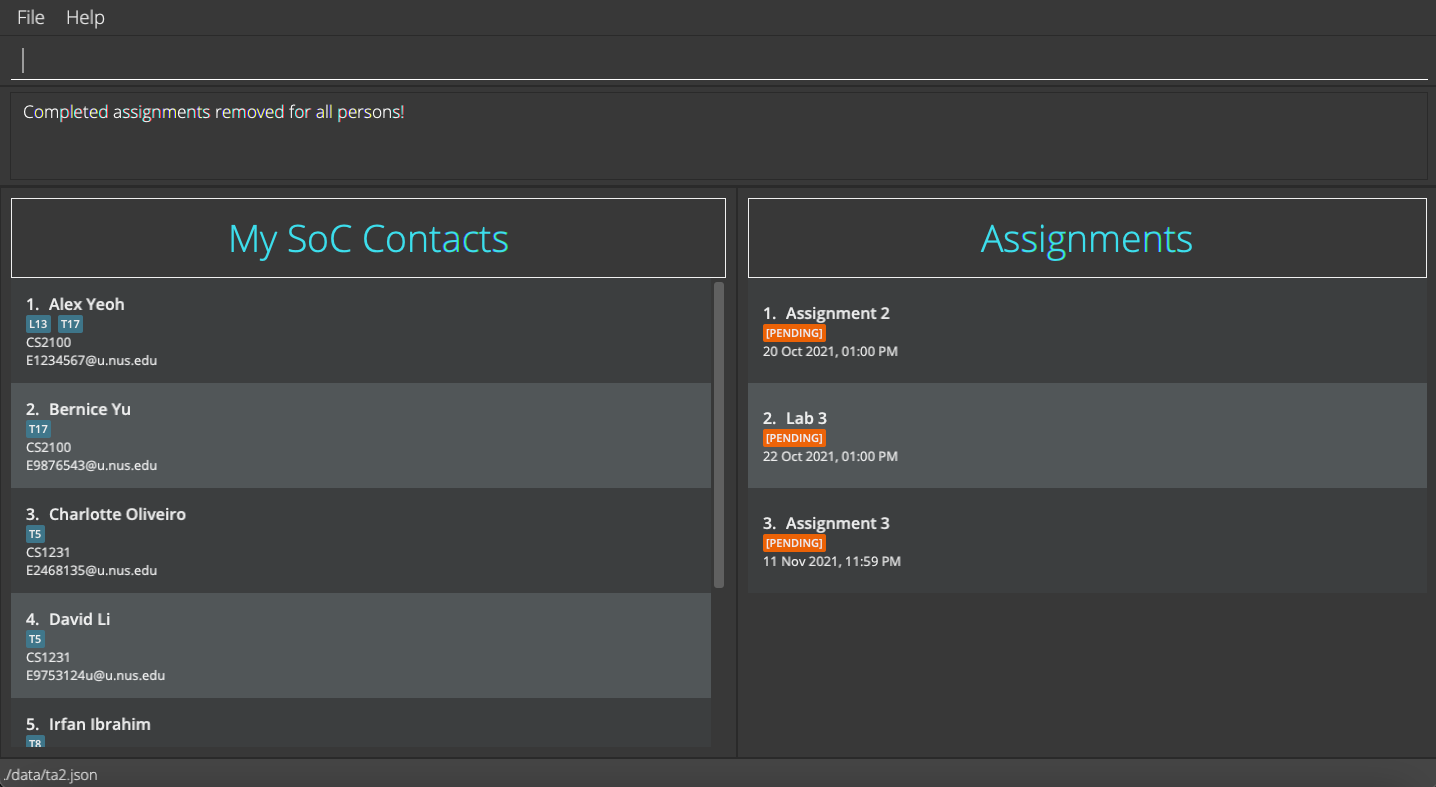
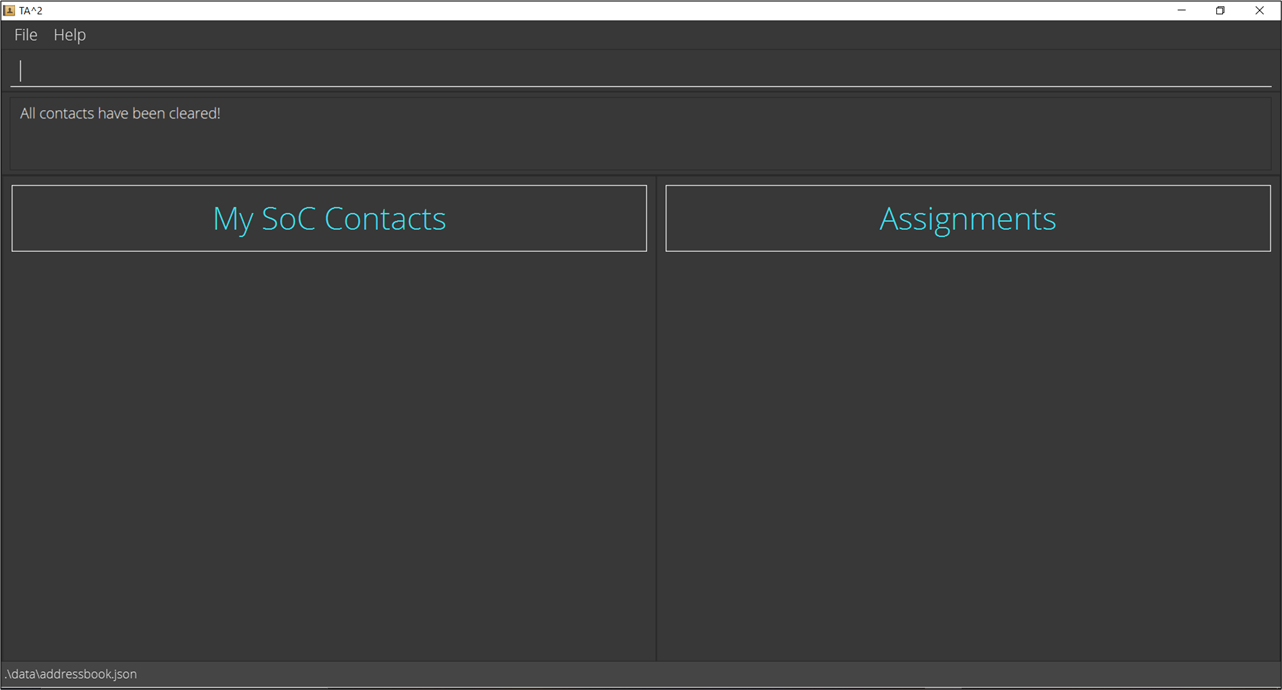
Clearing all entries
-
Prerequisites: Have multiple persons in your list.
-
Type
show 1to display the first person’s assignment list. -
Test case:
clear
Expected: All contacts will be deleted from the list. Assignment list panel will be cleared. Success message shown in the status message.
Undoing a command
-
Undoing a command at the start of program.
- Test case:
undo
Expected: Nothing is undone. Error details shown in the status message since no state can be undone.
- Test case:
-
Undoing a command after entering some commands.
- Test case:
undo
Expected: Retrieves the effect before conducting the last command (exceptundo).
- Test case:
Redoing a command
-
Redoing a command at the start of program.
- Test case:
redo
Expected: Nothing is redone. Error details shown in the status message since no state can be redone.
- Test case:
-
Redoing a command after a
undocommand.- Test case:
redo
Expected: Recovers the effect of lastundocommand.
- Test case:
-
Redoing a command after a command except
undo.- Test case:
redo
Expected: Nothing is redone. Error details shown in the status message since no state can be redone.
- Test case:
Exiting the Program
- Test case:
exit
Expected: The TA2 window will close promptly.
Saving data
-
Data file
ta2.jsonis missing.-
Prerequisites: To simulate, delete
ta2.jsonfile. -
Expected: TA2 will start with sample data.
-
-
Data file
ta2.jsonin wrong format.-
Prerequisites: To simulate, remove a square bracket in the
ta2.jsonfile. -
Expected: TA2 will start with no data.
-
Corrective action:
-
If you wish to start TA2 afresh, just input commands as per normal and the existing file will be overridden with the new data that you input.
-
If you wish to retrieve your existing data, do not input any command.
-
Copy the current
ta2.jsonfile to another location before exiting TA2. -
Look through
ta2.jsonand correct any formatting issues. -
Copy the corrected
ta2.jsonback to the data folder and start the application. -
TA2 will display all the data normally if
ta2.jsonis in the correct format. Ifta2.jsonis still in the wrong format, repeat the corrective action. -
Refer here for a sample data file in the correct format.
-
-
-